Excel 2000 Module 2
Excel Basic
Start
<Excel>
Click <File> <New>
Moving Between Worksheets
Each Excel workbook is made up of individual worksheets. By default, a new workbook contains three blank worksheets.

Click to the Sheet tab (name of the sheet) appear along the bottom of the workbook window.
Renaming Worksheets
By default, the worksheets in each Excel workbook are names Sheet1, Sheet2, Sheet3. Renaming a worksheet can remind you of its contents.
Mouse right-click (Select Short-cut Menu) :
Rename

<Sheet1> type <Before>
<Sheet2>
type <During>
<Sheet3>
type <After>
Inserting,
Moving/Copying, Deleting Worksheets
Either using Right-click or Menu <Insert>
<Worksheet>.....or Drag-and-drop to move...Menu <Edit>
<Delete> to delete.
Changing No. of Workheets
Microsoft Excel will give you a default number of worksheets whenever you create a new workbook. You can change the default number of the worksheets from 1 to 255.
Click <Tools> <Options>
Click <General> tab
Select 5 at <Sheets in new workbook:> box
Entering Text in a Worksheet
You can enter three basic categories of data in an Excel worksheet : text, numbers, and formulas - appears in the Formula bar and in the active cell.
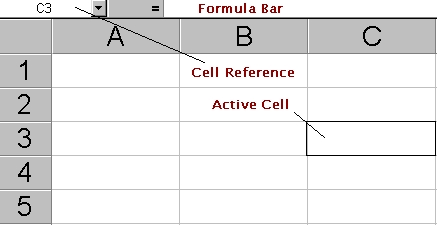
By default, a text entry appears left-justified in a cell. If the entry is longer than the defined width of the cell, it either "spills over" into the adjacent cell (if that cell is not empty), or it appears in truncated form (if the adjacent cell is not empty).
Click <Before> sheet tab
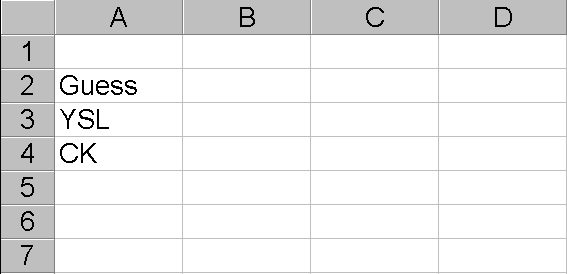
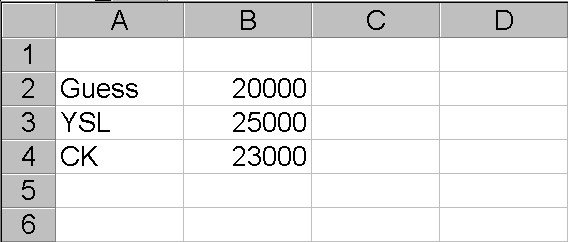
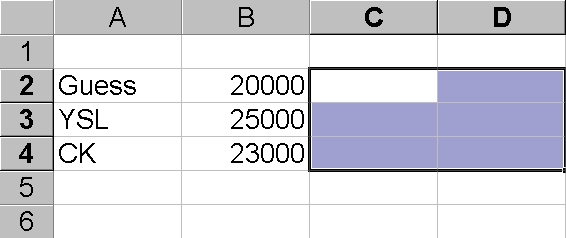
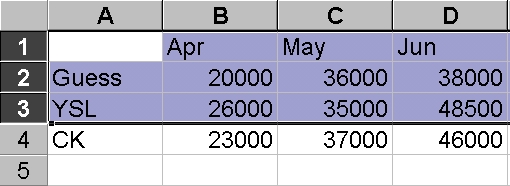
Type Cell A2 : Guess
Type Cell A3 : YSL
Tpye Cell A4 : CK
Reverse One or More Actions
Whenever you perform an action that is not what you intended, you can reverse the action with the Undo command or if you want to Redo command.
Standard Toolbar :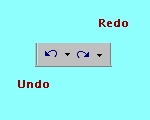
However, if you save a workbook, you can no longer Undo or Redo changes. If you think you might want to Undo or Redo a particular action, don't save changes to the workbook until you are satisfied with the results.
Entering Numbers in a Worksheet
A numeric entry contains some combination of the digits 0 through 9 and, optionally, the following special characters :
+ positive value
- or ( ) negative value
$ currency value
% percentage
/ fraction
. decimal value
By default, a numeric entry appears right-justified in a cell. If the entry is longer than the defined width of the cell, it appears in scientific notation or (####), or rounded.
Type Cell B2 : 20000 <Enter>
B3 becomes the active cell
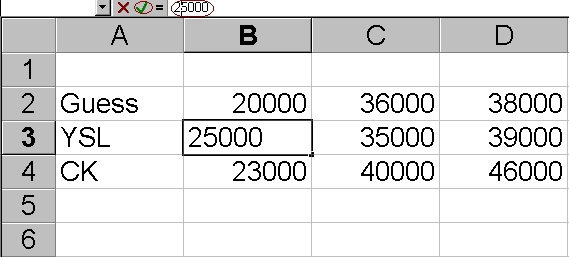
Type Cell B3 : 25000 <Enter>
B4 becomes the active cell
Type Cell B4 : 23000 <Enter>
B5 becomes the active cell
Entering Dates in a Worksheet
Date in Excel worksheets can be represented using only numbers or a combination of text and numbers. For example : January 22.
Like text, dates are often used as row and column labels. But unlike text, dates are considered as serial numbers (sequential and cannot be added, subtracted, and used in calculations).
At Cell A1, try to type the date of today.
Is it Text? (left-aligned)
Is it Number? (right-aligned)
Entering a Range of Data
To enter data in an individual cell, you type the data, and then <Enter>. When you have consecutive entries to make, you can select the range first to enter the data more quickly.
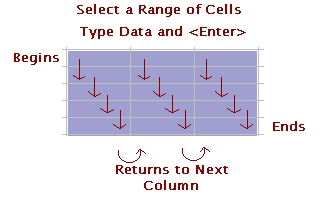
Drag-and-drop Cell C2 to Cell D4 (C2:D4)
Type Cell C2 : 36000 <Enter>
Type Cell C3 : 35000 <Enter>
Type Cell C4 : 40000 <Enter>
Type Cell D2 : 38000 <Enter>
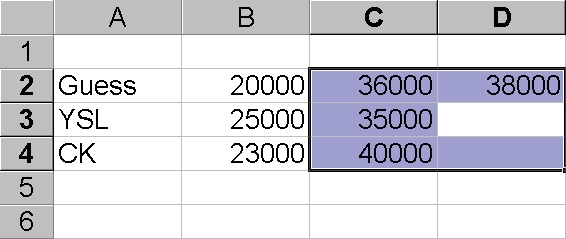
Type Cell D3 : 39000 <Enter>
Type Cell D4 : 46000 <Enter>
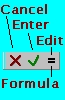
Editing Cell Contents
You can change the contents of the cell by first double-click on the cell or click at the Formula bar of the cell. This is the Edit mode of Excel, where you can type, delete or backspace while correcting.
When Excel is in Edit mode, three buttons appear to the left of the Formula bar :
Cancel, Enter, and Edit Formula.
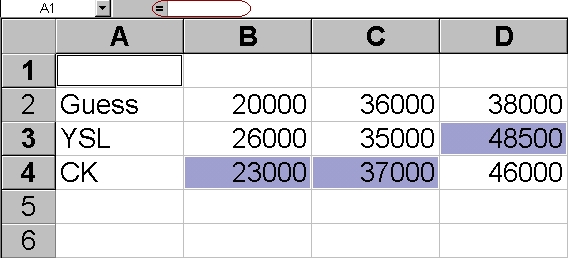
Edit Cell B3 : 26000
Edit Cell C4 : 37000
Edit Cell D3 : 48500
Creating AutoCorrect Entries and Testing AutoCorrect
Excel's AutoCorrect feature helps eliminate typographical errors in worksheets such as irregular capitalization or commonly mistyped words.
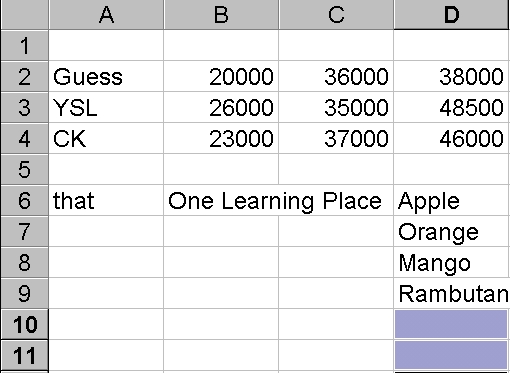
At cell A6
Type htat
Select the word that you just typed
Press <Delete>
Click <Tools> Click <AutoCorrect>

In the Replace box, type htat
Press <Tab>
In the With box, type that
Word will replace all occurances of htat with that
Click <Add> button Click <OK>
Click <Tools> Click <AutoCorrect>
In the Replace box, type
Press <Tab> OLP
In the With box, type One Learning Place
Click <Add> button Click <OK>
At cell B6
Type OLP
Using AutoComplete
Excel's AutoComplete feature helps to complete the entry for you based on the enteries that you have entered in that column


Type
Cell
D6
: Apple
Type
Cell
D7:
Orange
Type
Cell
D8
: Mango
Type
Cell
D9:
Rambutan
At cell D10
Type O
'O'range will be shown. To accept just select.
At cell D11
Type M
'M'ango
will be shown. To accept just select.
Using Numbered Series and AutoFill
When you enter data that forms a series or pattern, Excel can save you time by completing the series for you.
Examples : days of the week, months of the year
Excel's AutoComplete feature helps to complete the entry for you by dragging the fill handle on the cell border (bottom left corner).
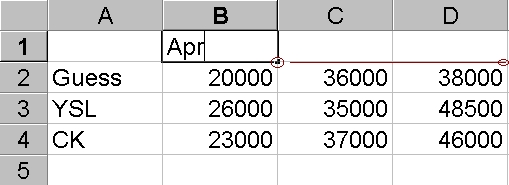
Type
Cell
B1
: Apr
Apply
AutoFill
by
dragging the fill handle on the cell border across till D1.
Creating Customizing List for AutoFill
Excel's AutoFill feature can be customized so that frequently typed text can be listed as a AutoFill Series.
Click <Tools> Click <Options>
Select <Custom Lists> tab
Select <New List> tab
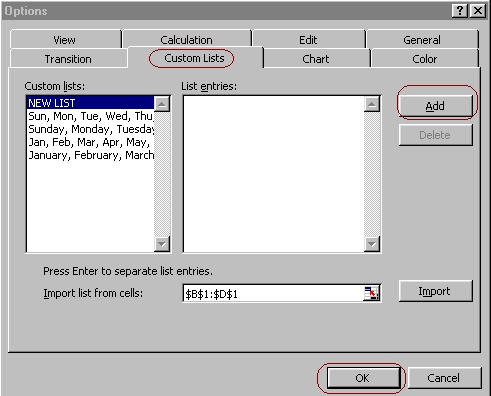
Type in the <List entries:> box
Apple
Orange
Mango
Rambutan
Click <Add> Click <OK>

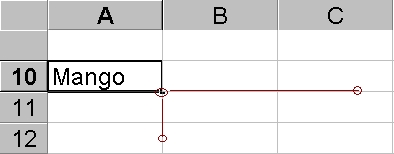
Select Cell A10, type
Mango
Apply
AutoFill
by
dragging the fill handle on the cell border across and downwards.
Moving Data by Dragging Cells
You can move cells to another area of a worksheet by dragging the selection to another position.
Moving Data by Dragging Cells to Another Workbook
Click <File> <New>
You have created another Workbook
Click <Window>, <Arrange>, <Tiled>
You will notice both workbooks are displayed out in the same window screen
To move cell to another Workbook, select the cells, press <Alt> key while you drag the range to the tab of the other workbook.
Cutting, Copying, Pasting, and Clearing Cells
When you change your mind about the placement of the contents of a cell, row or column, or simply a mistake, you can change the way you've placed data in your worksheet.
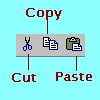

Copying, Cutting, Pasting
Copy is to make a copy of selected range of cells and send a copy of that selected cell(s) to the Windows clipboard (which is an area of memory reserved for data, text, graphics, and others).
Paste is to send the Windows clipboard contents to a location inside your workbook.
Cut is to delete or erase the selected range of cells and send that data to the Windows clipboard for later pasting elsewhere. Cutting and Pasting means moving the range of cells.
Select Cell D10 <Cut>
Select Cell D11 <Paste>
Select Range D10:D12 <Copy>
Click <During> tab
Click D10 <Paste>
Reverse One or More Actions
Whenever you perform an action that is not what you intended, you can reverse the action with the Undo command or if you want to Redo command.
Standard Toolbar :
However, if you save a workbook, you can no longer Undo or Redo changes. If you think you might want to Undo or Redo a particular action, don't save changes to the workbook until you are satisfied with the results.
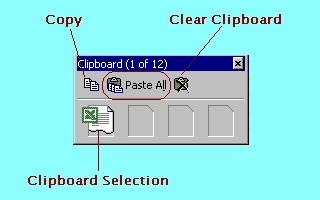
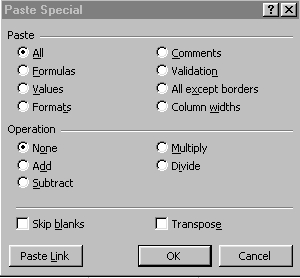
Using Additional Paste Features
Excel provides some other useful techniques that extend your editing capabilities with Special commands.
Menu, Point and click <View><Toolbars> :
click Clipboard
Click <Before> sheet tab
Select Range D10:D12 <Copy>
Click <After> Sheet tab
Click Cell D10 <Paste>
Click <Edit> <Paste Special>
Close <Clipboard> toolbar


Inserting and Deleting Cells, Rows, and Columns
You might want to insert a blank cell, column, or row to create space for entering additional information.
To insert, use <Insert> menu.
To delete, use <Edit> menu.
Alternatively, Right-click select Popup menu.
Select number of rows or columns to
insert or delete by selecting range of cells
Select Rows 1 to 3
Insert Rows
Type the following
Select number of rows or columns to
insert or delete by pointing to the Top Column and Side Row bars
Click <Edit> <Delete>
Select Row 6
Delete Row
Select Rows 8 to 16
Delete Rows
Adjusting the Size of Rows and Columns
Although a cell entry can include up to 32,000 characters, the default column width is only 8.43 characters. To avoid the number from "spilling over" into the next column, we widen the column width by clicking the right edge of the column selector and dragging it right and left.
You can also adjust the row height by clicking the bottom of the row selector and dragging it up and down.
Select Row 4 Adjust Row Height
Select Column D Adjust Column width
Click <Format> <Column> <Width>
Type 13 Click <OK>
Naming and Saving Workbooks
The work you have completed is stored in your computer's temporary memory. To save your work for further use, you must give the workbook a name and store it on your computer's hard disk drive.
Click <File> <Save As>
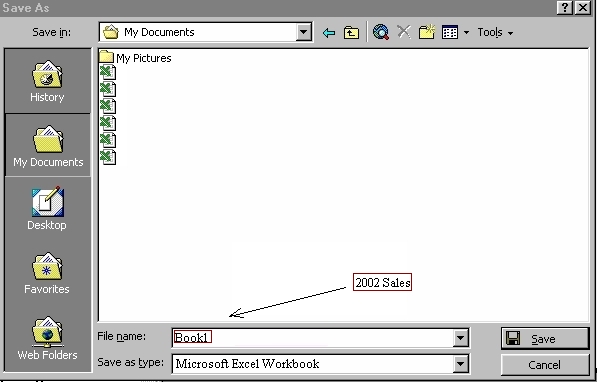
Type 2002 Sales
When you save a file, you cannot include any of the following characters in the file name :
* \ / < > ? : ; "
Opening Workbooks
After you save an Excel workbook, you can reopen it at any time to review its contents and make changes. For Practice Files from Excel folder of Iverson Exercises.


Open Document is to transfer a workbook file (.xls filename extension) from disk into memory.
Menu, Point and click <File>: click Open
Excel keeps track of the last four workbooks you opened and then places their file names at the bottom of the File menu.
Practice Exercise 1
Click <File>
<New>
Practice M2Ex1
<Save
As>
M2Ex1 at
<My Documents> folder
Click <File> <Close>
Click <File> <Exit>
 Edwin
Koh : We
completed on the New
Knowledge and Skills in
Edwin
Koh : We
completed on the New
Knowledge and Skills in
Excel
2000 Module 2.