Excel 2000 Module 6
Printing
One
of the easiest ways to share the information in a worksheet or
workbook is to print copies for others to review.
Start
<Excel>
Previewing Your Worksheet
Print Preview for previewing any Windows 2000 document using the WYSIWYG (pronounced wizzy-wig) as an acronym for What You See Is What You Get, the concept that your screen shows your output as it will look on paper : Set Margins, Print Area and Print Order, Headers and Footers, etc.
Menu, Point
and click <File>:
click
Preview

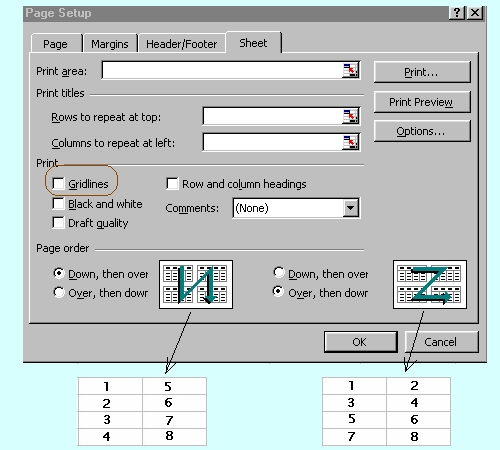
Printer subsystem is the Windows printer interface for direct printed output for all your Windows programs. You can decide on the print sheet order.
Menu, Point and click <File>, <Page Setup> : click Sheet
Menu, Point
and click <File>:
click
Print

Changing the Orientation and Scale
You can change the orientation of a worksheet so that it prints either vertically or horizontally on a page. A Portrait setting means a vertically printed worksheet, while a Landscape setting means a horizontally printed worksheet.
Click <File> Click <Page Setup>
Click <Page> tab

Click <Landscape> option
Click <OK>
Click <File> Click <Page Setup>
Click <Page> tab
Select <Fit to:> option by 1 page wide
The worksheet is scaled to fit on one page
Click <OK>
Click <Print Preview> button

Click <Close> button


Adjusting Margins and Centering a Worksheet
By default, worksheet margins are 1 inch on the top and the bottom, and 0.75 inch on the left and right. If you add a header or footer to the worksheet, it is separated from the body of the worksheet by 0.5 inch.
Click <File> Click <Page Setup>
Click <Margins> tab

Change Top and Bottom Margins
to 1.5 inches
Select Center on page option
Click <Horizontally> and <Vertically>
Click <OK>
Click <Print Preview> button
Click <Close> button

Adding Headers and Footers
A header is a line of text that appears at the top of each page of a printed worksheet, and a footer is a line of test that appears at the bottom. Headers and footers commonly contain such information as a page number, the title of a worksheet, and the date a worksheet will be printed.
Click <View> Click <Header And Footer>


Select Header dialog box
Click <Date> in the Right Section box
Click <OK>
Select Footer dialog box
Click <Page Number> in the Center Section box
Click <OK>
Click <Print Preview> button
Check Header and Footer
Click <Close> button
Adding and Deleting Page Breaks
Excel determines the number of pages on which a worksheet will print based on the size of the worksheet, the margin settings, the orientation, and the scaling. Automatic page breaks mean breaks that Excel places on the content from one page to the next.
Select Cell A8
Click <Insert> Click <Page Break>
Excel inserts a page break in the worksheet below row represented by a dashed line on the worksheet.
Click <Print Preview> button
Click <Close> button
Select Cell
Click <Insert> Click <Remove Page Break>
Setting and Clearing a Print Area
If you don't want to print an entire worksheet, you can print only an area you select by setting a print area.
Click <File> Click <Page Setup>
Click <Page> tab
Select <Adjust To box:> option
Select 100%
The worksheet scale returns to 100%
Click <OK>
Select Range
Click <File> Click <Print Area>
Click <Set Print Area>

A dashed line encompases the print area
Click <Print Preview> button
Click <Close> button


Click <File>
Click <Clear
Print Area>
The print area is cleared
Setting Other Print Options
To further customize your worksheet printout, you can print row and column labels, gridlines, row numbers, and column letters on each page. You can choose to print in colour or black and white, the quality of the printing etc.


Practice
Exercise
 Edwin
Koh : We
completed on the New
Knowledge and Skills in
Edwin
Koh : We
completed on the New
Knowledge and Skills in
Excel
2000 Module 6.