
Instructions:
C: The cardboard-work
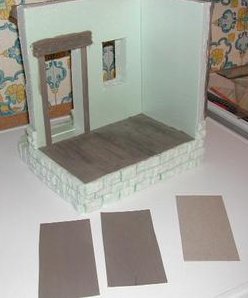
| a. Paint a sheet of cardboard with
the Umber-green. If you could not get it, mix it yourself by taking two parts of Raw Umber
with one part of olive green. |
Pic 29
|
|
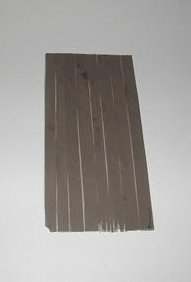
b. Cut this piece of flooring into small stripes of slightly different
width without a ruler or any other measuring, we want it a bit uneven to look old and
worn. |
Pic 30
|
|
c. Cut two stripes of about half an inch and as high as the door and glue them to the sides of the door hole Pic 31 |
Pic 31
|
|
d. Cut a piece of Balsa wood, one inch high and about 1 inch longer than
the width of your door. Carve the edges, cut deep chips out of the ends and cut deep
scratches into it all over. Treat it real bad! Glue into place with hot glue gun Pic 32 |
Pic 32
|
| e. Paint it with Umber green Pic
33
Pic 33 |
|
| f. Paint all your woodwork on the
outside with Umber green Pic 34
Pic 34
|
|
|
g. Cut one piece of unpainted cardboard, a little bit wider than the hole of the door. Cut two pieces of painted cardboard of the same size Pic 35 |
Pic 35
|
|
h. Cut the painted pieces into stripes again. (No ruler!) Bend and make
cracks and mix. Cut out chips at 4 stripes at one end. |
 Pic 36 Pic 36
|
| i. Cut stripes again and glue onto
ONE (1) side of the door like a big " Z ", but the other way around, like you
look at a Z in the mirror. Pic 37
Pic 37
|
|
| j. Glue the door into place with
Tacky, with the " Z " inside of the roombox as shown in Pic 38 and Pic 39
|
|
Pic 38 |
Pic 39 |
Onto more of the Instructions ![]()
{Workshop - Page 1} {Page 2} {Page 4} {Page 5} {Page 6} {Page 7} {Page 8}