
Instructions:
E: Plasterwork, basic colouring of the stones
| a. Mix the spackling compound (or take the already mixed
stuff) and start to plaster the walls of the inside with the small spatulas. Take the
bigger one for the middle areas and the tiny one for the corners. There is no need to do
it perfectly, because we will treat it with our fingers anyway. Do the same with the outside of the scene and put it around the bricks carefully, covering about half of the bricks with the spackle. Don’t forget the sides of the door and the window! Do the top of the walls also. Do the small front of the floor area outside of the door. Now turn to the inside again and dip your middle finger all over the plaster to create a nice rough surface. Do the same with the outside. Close the gaps of the stones at the corners with spackle Pic 60 |
Pic 60
|
| b. Press the shutters and the roof over the door into the wet spackle, it should stay there, if your spackle is not too thin. Pic 61 |
Pic 61
|
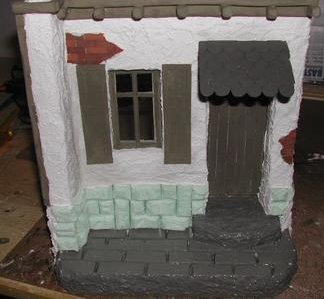
| c. Your plasterwork should look as on those
pics now Pic 62, 63 Let it dry overnight!
|
|
| d. Take out the Umber green again and redo the
timberwork, if you messed it up with plaster. Paint the inside of the hole in the wall
with Umber green. Give your brickwork a VERY thin wash with Umber green. Mix this wash
with 1 drop of Umber green and a soupspoon of water. Pic 64 |
Pic 64
|
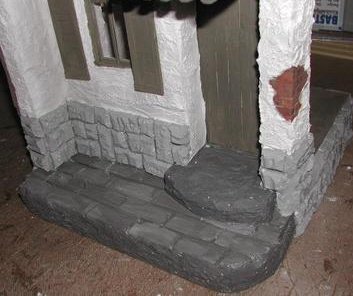
| e. Paint the stones on the floor in front of the door
and the doorsteps in a dark grey ( you can use the slate-grey, if you have leftovers ) Pic
65 |
Pic 65
|
| f. Paint the stones on the walls all around
with light grey and add some highlights to the dark stones on the ground with the same
lighter grey. Pic 66, 67
Pic 66
Pic 67 |
|
| g. Add a little of the dark grey in the middle of the hole. Pic 68 |
Pic 68
|
{Workshop - Page 1} {Page 2} {Page 3}{Page 4} {Page 6} {Page 7} {Page 8}


 Pic 62
 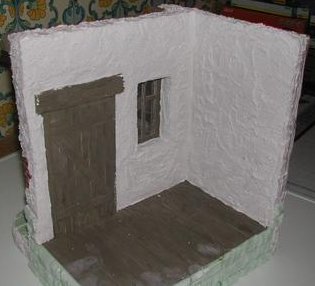 Pic 63