

Instructions:
D: The window, the brickwork, the shutters, small roof over the door
| a: The window Cut a piece of plexiglass or thin glass to the size of your window, about a thread larger than the window hole and squeeze it into the hole. Leave more windowsill in the inside, about one quarter outside and 2 quarts inside. Cut 2 stripes of the painted cardboard, as long as the window and 7 millimeters wide and glue onto the pane. Pic 40 (right) Do the same on the inside and fit in the upper and lower parts.
Pic 41 Fit in the upper and lower parts on the outside Pic 42 |
 Pic 40 |
 Pic 41 |
 Pic 42
|
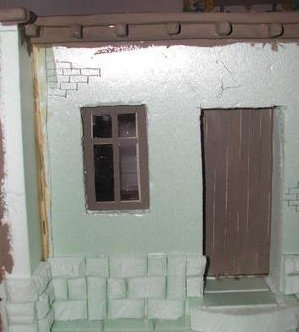
| Fit in a " window cross
" on the outside and inside of the window, about 5 millimeters thick. Pic 43, 44
|
|
| On the inside of the window, add a small
frame at the INNER line of the first frame and put one small stripe onto the vertical
piece of the cross. This resembles the pains, which can be opened. Pic 45 |
 Pic 45
|
| On the outside of the window, add a small
frame at the OUTER line of the first frame and put a small stripe onto the vertical piece
of the cross. Pic 46 I know, this is tricky and always costs me blood sweat and tears, but I promise, it is the trickyest part of the whole project. |
 Pic 46
|
| b: The brickwork Cut several bricks from your sheet of paper brick or use whatever bricks you got and glue them into the places of your desire as shown in Pic 47,48
|
|
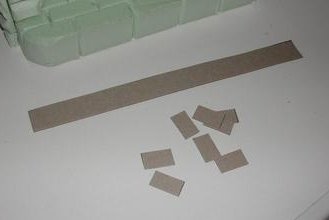
| c: The shutters: Cut two pieces of unpainted cardboard , about 2 mm bigger than your window. Cut in the middle, so that you have 4 equal pieces. Cut two of them into small stripes, about 4 mm thick, but DON’T use a ruler, cut freehand! Bend them to make cracks and mix them. Pic 49 |
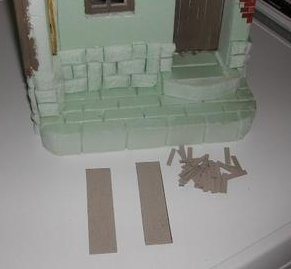 Pic 49
|
| Glue them onto the other two parts Pic 50 |  Pic 50 Pic 50
|
| Cut thin stripes and glue a frame onto the shutters Pic 51 |  Pic 51 Pic 51
|
| d: Small
roof over the door
Cut two triangles, 5 cm x 2 1/2 cm Pic 52
|
|
| Make triangles stronger, by putting on a second layer
of cardboard-stripes Pic 53
|
|
| Cut stripes of unpainted cardboard, 2 cm
wide for the shingles. Cut off pieces of 1 cm. Pic 54 |
 Pic 54
|
| Make those shingles round at one side. Pic 55 | 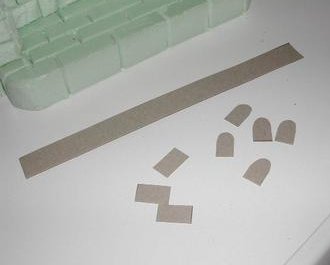 Pic 55
|
| Glue them onto the little roof in 6 rows. Pic 56 |  Pic 56
|
| Paint the shutters (both sides), the triangles (all around) and the underside of the roof in Umber Green. Pic 57 |  Pic 57
|
| Paint the upper side of the roof in slate-gray (Mix a little black with a drop of white) Pic 58 |  Pic 58
|
| Glue the two triangles into place under the
roof with Tacky, the small sides towards the house wall. Pic 59 Put shutters and roof away, until we plaster the house |
 Pic 59 Pic 59 |
Onto more of the Instructions ![]()
{Workshop - Page 1} {Page 2} {Page 3} {Page 5} {Page 6} {Page 7} {Page 8}
 Pic
43
Pic
43
 Pic
44
Pic
44 Pic 47
 Pic 48
 Pic 52
 Pic 53