|
|
| Burning Using EZCD Pro 95 |
| Step 1 |
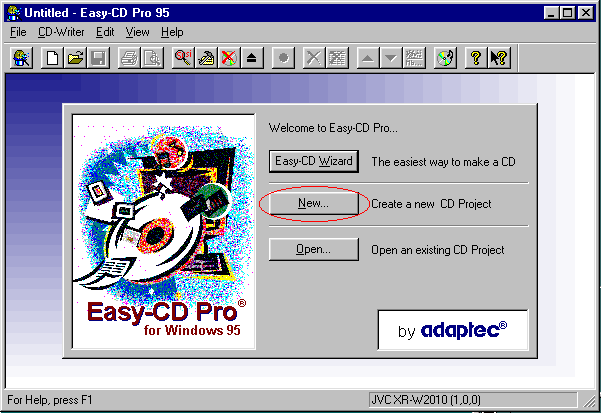
Open Easy CD Pro 95 and select "New".
|
| Step 2 |
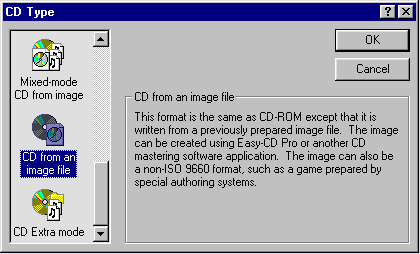
Next, select "CD from an image file" as the type of CD you
will be creating. This means you'll be burning your CD as specified
in the ISO image file, not choosing the type yourself, etc.
|
| Step 3 |
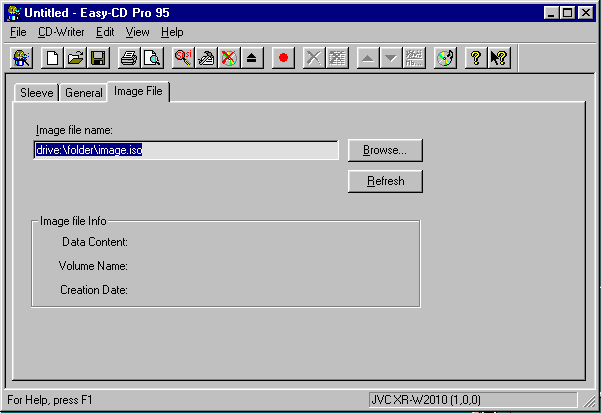
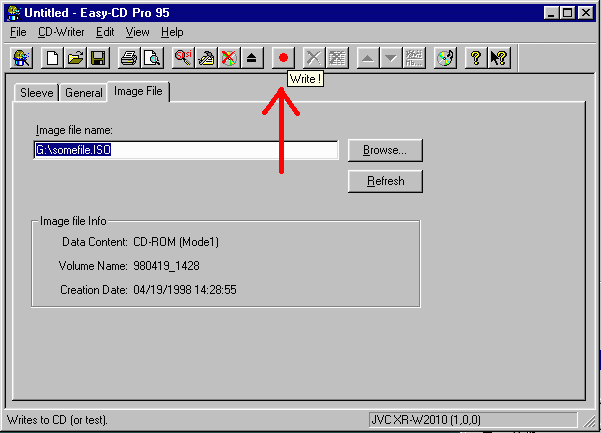
Now, on the "Image File" tab, locate the ISO image file
you wish to burn. Either type in the pathname or (safer) use the
"Browse..." button to find it. EZCDPro will read the ISO
to determine the CD's volume name and other pertinent information
(such as how large the ISO is).
|
| Step 4 |
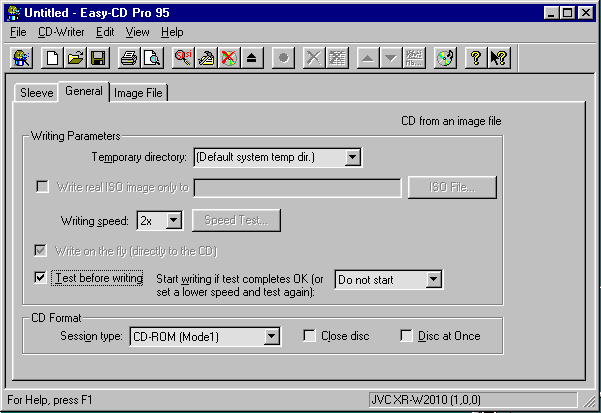
Next, click on the "General" tab and configure it as you
desire. The "Temporary directory" can likely always be
left as is, The "Writing speed" should probably be the max
your burner supports, although there may be times you wish to slow
it down to better ensure a correct burn. Selecting "Test before
writing" is a personal choice. If you've never used this burner
before, its a very good idea to check this to make certain the burn
will succeed. If you've burned with it before and had no problems,
it is much faster to uncheck this and go straight to the burning
stage. If you do check it, you have a further choice as to what to
do once the test completes successfully. You may either stop (not
burn) or continue on with the burn. This one's your call.
The "CD Format" area should probably stay as in the
image below. Mode 1 (Data only) CDs are the ones that EZCDPro
handles best and if you're burning a Mode 2 CD you probably want
CDRWin anyway. Closing the disk prevents further data being written
to it. If the disk is mostly filled by the image and/or you
want/need EXACT, pristine copies of the original CD, check this. If
you think you may wish to add more info to it at a later date, leave
it unchecked.
Finally, "Disc at Once" should be left unchecked. It is
usually only needed when you wish to record audio and have the
tracks blend together without an audible pause. Rarely an issue with
program CDs.
|
| Step 5 |
Ignore the "Sleeve" tab as there are much better programs
around to create Jewelbox covers. Move on and press the
"Write" button, which looks like a red dot in the toolbar.
Now you're burning!
|
| Step 6 |
Now, make sure you've got nothing else going. No screensavers, no
downloads in the background, nothing.
Once you've gone ahead and made some successful burns, you can
spend the time experimenting with what you can and cannot have
running while your burn is in progress. Depending on your
configuration (IDE vs SCSI), the buffer in your burner, your OS,
etc., you may find that you can go about your normal tasks without
fear. For now, however, just press the red button and walk away.
2x burners can take 40mins or so for a full CD and 4x burners
about 20mins, so plan ahead for something to keep you busy.
|
| Step 7 |
After the time is up you will see one of two messages. The first is
good and is the "Write Successful" message. This means
you've got an exact duplicate of whatever was on the disk the image
was made from. Sure hope it turns out to be as good as the talk,
hmmm?
The second is an error message, usually indicating the burn
failed. If you're technically inclined, see if you can guess/figure
out what when wrong, correct it and try again. The blanks ARE only
about a buck a pop, so it won't break you. If you aren't or still
can't figure out what went wrong, write down your system
configuration information and a detailed description of what you
did, and post it to the ~tools.d group where we can try and help you
out.
Good Luck! |
|
![]()
![]()
![]()