Back to Photo Page
Dollhouse Construction Photos, Page One
Brick Work and Flooring

This is what everything looks like when you're just starting out: lots of sheets of 1/8" plywood. The sheets are die-cut, meaning they're cut most of the way through so the parts can be pushed out with little or no cutting. That's the idea anyway. I found a few sheets that disassembled themselves in shipping while several others refused to even after a second pass with the utility knife.
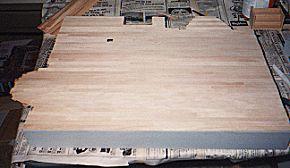
Here's the assembled 1st story floor. Notice that the foundation is painted and ready to brick. The gray paint will show up as the mortar lines between the bricks when we're finished.
 Ā
Ā
 Ā
Ā
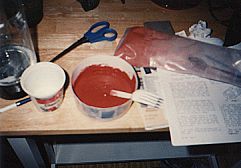
This gritty pink powder (along with white glue and water) will become the "liquid" brick in the last picture. Following the instructions includes mixing "until mixture starts to hold its own shape like cake frosting."
Whoever said that a picture's worth a thousand words must have had a better camera! This picture could have told the whole story if it was only easier to see. Notice the brick patterned webbing that's been put on the base. (You can see it best at the bottom right hand corner of the photo.) It's a long sticker that covers the mortar lines of the wall but not the area the bricks will inhabit.

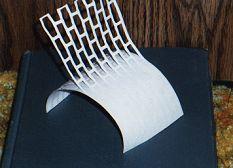
OK, these two photos come from my new camera and show better shots of the webbing. This is really just an extra piece I had stuck onto a book, but you get the idea.
 Ā
Ā

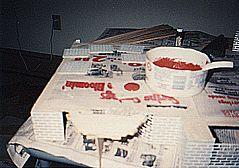
These pictures show the "brick" mix smeared on the unattached wall pieces and the main base. It's a gritty thick mixture and it getting harder. It's a race against time to get the goop on all the pieces before it sets up. You don't want to remove the webbing too soon, as your bricks might run. But you can't wait too long or you won't be able to get the sticker out from underneath the hardened brick.
 Ā
Ā
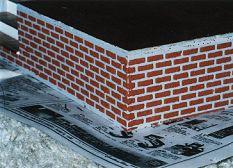
It's a sudden transformation. The webbing is carefully removed taking the "brick" on top of the mortar lines with it. These pictures don't do the process justice; the brick isn't just painted on, it's a little over 1/16 of an inch thick and it makes for very realistic effect.
 Ā
Ā

Here's the completed base with its brick work and stained hardwood floor. And yes, the floor was glued with contact cement one "board" at a time, much like real flooring.
 Ā
Ā
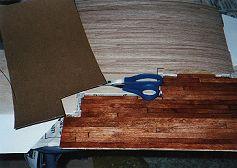
These pictures contrast two different methods of flooring. The first picture shows some individual floor boards (with a penny if you're interested in scale). The kit doesn't come with enough flooring to do both stories so I bought 2 sheets of flooring to finish it up. It's the same idea except the sheets come with the flooring already glued to a backing. You just cut it to fit and glue it straight to the floor.
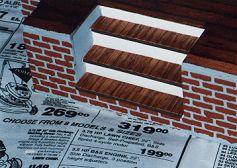
This photo is a shot of the steps leading to the front porch. This picture turns out to be some what of an optical illusion. The dark wood are the treads while the white part is the vertical risers. The stairs are inset in the foundation. If the steps look up-side-down to you and floating in mid-air, try looking at the picture with the left hand side of the steps covered.
Photo Page | Next Page