Back to Photo Page
Dollhouse Construction Photos, Page Two
Wall Construction
 Ā
Ā

Believe it or not, these small pieces of wood are destined to become the exterior walls of the house. Once you arrange them correctly, you glue them together.

They go something like this. I ended up with two extra pieces after finishing the walls. After double and triple checking make sure I hadn't left them out, I glued the pieces together. This was typical of this kit: they seem to err on the side of surplus. I also had extra webbing, extra brick mix, and extra flooring.
 Ā
Ā

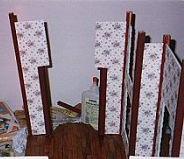
Once the glue has throughly dried they're ready to paint and paper. Here's the two samples of the wall paper I picked complete with miniature patterns. Papering the walls is a snap; it's one of the times miniature materials are easier than the real thing.

It's hard to see in this picture, but these are the corner pieces for the walls. The idea is pretty neat, the individual wall pieces are joined together by grooved molding that (in theory any way) forces them together at the correct angle. This is pretty important, because this is no simple rectangular house. There are 15 external wall pieces in this kit making for 16 corners. I took this picture after painting Į of the pieces (the ones with paint are behind the bottle) to make it easier to see. Notice the piece closest to the camera. It joins 2 walls from the bay windows.
 Ā
Ā
 Ā
Ā
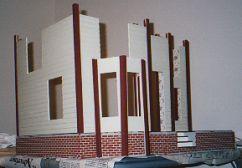
Up goes the walls. Looks pretty easy. But it's deceptive. These pictures are actually from a trial run (i.e. without glue). I had to contend with a lot of warping. Some pieces actually needed to be forced into place. The walls are bound to warp for a lot of people, but I probably had it worse than most as it's been a particularly wet year here in southern Iowa.
 Ā
Ā
Here's the walls going together (for real this time).
 Ā
Ā
 Ā
Ā

Because the pieces were warped, many of them needed to be held tightly in place. A task I accomplished though a lot of creative rubber band work. I ended up having to glue a small section of the wall pieces at a time to keep the walls out of the rubber band's way.
 Ā
Ā
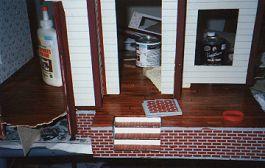
In the end things were pretty close, but not quite right. Notice the gap between the floor and the walls of the bay window. My advise to anyone else building this kit is to sand the walls in order to make them smaller. The second photo shows the angle the smaller wall section took. I actually had to break the floor beneath this piece to get it into place.
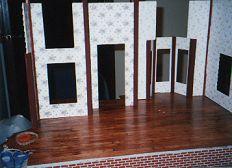
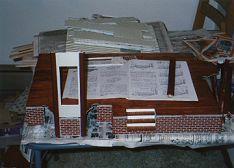
Here's the first hint at what it's going to look like from the inside. I've ignored the instructions at two points so far. I've already stained and varnished the floor and I put the wall paper on the walls before assembling. Now I'm beginning to doubt my wisdom. Since I papered clear to the edges of the walls, when I put the walls into their grooves the paper was a bit in the way. It wrinkled up on the edges of several of the walls. On the other hand, papering at this point seems very difficult. It would be hard to even get the right dimensions of a wall at this point. If I had to do it again I think I would still paper first, but I'd probably not go clear to the edge.
Here's a shot of the second story floor. The white areas are the bay window roofs and the wood colored section to the front is the balcony floor/porch roof. Notice the floor is preshaped to fit tightly around both the inside and the outside of the walls by the porch. I had to trim the floor considerably along these lines to get it to fit my walls. Even after my best efforts, my walls are neither perfectly square nor plumb.
Previous Page | Photo Page | Next Page