Back to Photo Page
Doll House Construction Photos, Page Five
Getting Ready for the Roof
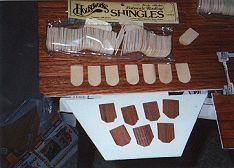
It's time to put the fishscale shingles on the gables. This picture compares two kinds of shingles. I wasn't satisfied with the rough fishscale provided with the kit (bottom), so I bought some nicer, smooth ones made by Houseworks (top).

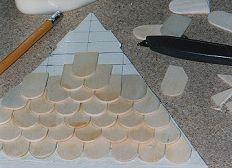
After drawing lines on the gable, I begin to glue shingles to the piece. The edges have to be cut by hand. You might notice the piece of "flooring" I painted and then put at the bottom edge. Without anything there it was very difficult to get the second row of shingles to lie flat (since the first one didn't over lap anything it was at a very different angle).
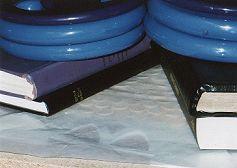
Surprise! Even though the instructions that came with the shingles suggest white craft glue, I wouldn't recommend it to any one else. I had shingles warping clear into ˝ circles, and had to put weights on them to keep them flat.

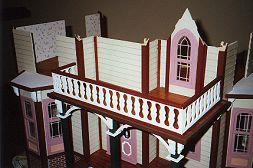
Here's a shot of the top edges of the walls. Notice the posts sticking up at the top. This is what the instructions suggest: building the walls first and then cut the posts. This seems a bit strange to me and at least one other person who emailed me to see what I'd done. I think the reasoning behind this is that if you cut them before assembling the walls it would be easy to get the angles wrong. If you're careful it would be easier to cut these pre-assembly, but you would have to be very careful not to cut the angles the wrong direction.

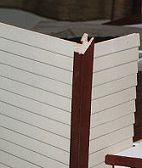
Each post needs to be cut at an angle that matches the gables, so the instructions suggest waiting until the gables are glued in place to do the cutting. I'd let them go this long, but waiting until there was even more to get in the way of the saw seems unrealistic. I didn't have too much trouble cutting them at this point, although it shook the whole house.

The house includes a little dormer with a window that opens onto the upper porch. I didn't even realize when I took the first picture that the dormer has two very small side walls that move it forward and on to the porch. They're so small you can't even see them in the second photo.


Like all of the largest dollhouse pieces, the roof pieces need to be spliced together. The length of the roof is longer than the sheet of plywood (and I'm assuming the size of the punch that makes the pieces). It would be nice if these parts would come in one piece, but the splicing is acceptable.

It's hard to see in this picture, but the top edge of each of the roof pieces is tabbed so they interlock to help put them in place. There's also the slots that (hopefully) line up with the tabs on the gables. If you look closely, you might be able to see the penciled lines marking the tops of each row of shingles. How do all these pieces fit into the roof? It took me a while to figure it out. All I can say is come back and take a look when the roof is on. I'll be sure to have pictures that give a real idea of what the roof looks like.

The roof is farther away than it might seem. I've done things a bit out of order while waiting for glue and paint to dry. Here's a box full of second story window parts that need to be sanded, painted and applied to the gables before I glue the gables in place and put on the roof.
Previous Page | Photo Page | Next Page