Back to Photo Page
Dollhouse Construction Photos, Page Eight
Cedar Shakes
 Ā
Ā

I started out by putting white tape over all the joints. I figured it would look better from the inside if the gaps showed white instead of shingle brown. Then I covered the joints with strips from brown paper bags, as I knew these areas would show through to the wood in spots and I didn't want to see white peeking through. In retrospect, a better method would be to paint the roof brown to begin with.
 Ā
Ā
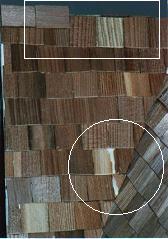
Here's the shakes starting up. Notice the small bits of white that shows through the cracks.
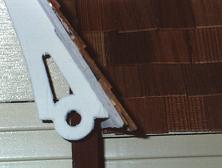
The angled edges need to be cut carefully. Here's a tip I learned late in the game: start each row at the angled edge-- that way you only have to cut these shakes on one side. Cut it diagonally right in the middle. Then you can use the other 1/2 for the row above it. I had to get the angle right and then cut the other side to make them the right size. This wasted the other part of the shake which meant I had to cut twice as many.
Another tip that worked well was to make a paper template of each edge to use to draw the angle on the shakes.

Here they are going up. I tended to "stair step" a lot-- when ever I got tired of cutting all those angles I put partial rows of shakes on up the roof. Of course, you can only do this until the top row has only one shingle, and you still have to cut those angles at some point.
 Ā
Ā

The first photo is the back edge (basically looking down at it). It's much easier to do than the front edge as the pieces butt up against each other. Unfortunately the hardest joint is also the most visible one. It's tricky to cut the two shakes of each sections edge so they cover each other tightly. Also notice in back where the one roof surface comes down to almost nothing. The character of the house makes for some tricky spots roofing.
 Ā
Ā

A strange feature of this house is it's small flat top. People handle this differently. Some make a floor/wall, others cover it with shakes. I just couldn't shake a flat surface (the real roofer in me coming out!) so I added a few scraps of wood to give it a small cap.
This always surprised me: here glue oozes out of a lower row of shakes even though everything but the top two rows has dried overnight. I probably used twice the needed amount of glue (good thick wood glue) and I had to mop up a lot of runs.
 Ā
Ā
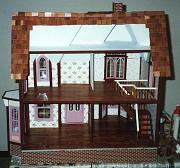
Think this is the finished house? Not quite. There's still some pieces of trim that need to go in, including the very visible roof edge. But it's getting pretty close....
 Ā
Ā

I bought this kit because of it's wonderful character. But I just can't glaze over its strange interior. For example, there's a chimney, but no solid wall to put it on, the stairs run right into the (missing) back wall, the only way to get to the porch roof is through a window, and the large attic had no windows at all.
And there's really no place for a bathroom or even a kitchen. The first two floors break basically into two rooms each with strange nooks between them. Realistically the house should be much larger. How small the first floor plans look when compared to the plans of my modest 2 bedroom apartment (in blue)! See the bathroom at the top of the apartment? You can't make them any smaller than that and still include a tub. Yet it hardly fits in the dollhouse.
But on the other hand, while the scaled up house might be small, the dollhouse is huge! To make a real scale Victorian house would take up even more space and be even more expensive.
Previous Page | Photo Page | Next Page