Back to Photo Page
Dollhouse Construction Photos, Page Seven
The Roof Goes Up
 Ā
Ā
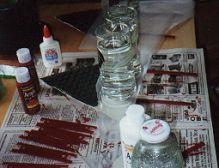
I'm getting more creative as I go on. Ignoring the instructions I carefully lined up the upper windows on the triangular gable pieces and glued them in place. I've also gotten more creative with finding tools. Notice the full water glasses I used as weights.
 Ā
Ā
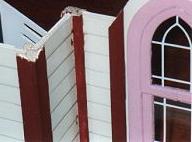
It's a little hard to see what this is a picture of. This is the inside and outside window trim glued onto the gable. They make great "pinchers." They're holding the gable in position as I take the second picture. I put some glue on the inside edge, slid it over the wall, and didn't have to worry about how I was going to hold it in place. I'd suggest this technique to anyone.
 Ā
Ā
All I needed to do was clamp the bottom of the trim in place as the glue dried. The gable walls are thinner that the special "siding" boards of the main wall. If I'd tried to glue them both in place at the same time I suspect it would have been difficult.
They all went up easily. I've heard since I did this that other people have had trouble getting these pieces to fit. If I understand them correctly their walls are a quarter inch wider than the gable making for large gaps in the roof. I didn't have that trouble, but if you're building this kit, I'd check for this problem early on.

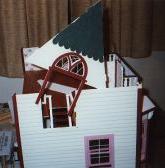
Here they are, real working windows. They're a bit tricky to get in. First you put the header in, then the windows, then the bottom board, and then you have to hold it in place while you glue over the excess space with the bottom trim board. I took a picture of this process, but failed to get it in focus. Some of the windows are a bit tight, but they do open and shut.
When I cut the posts I had trouble understanding how to trim these posts. They really need to be angled in both directions as the roof comes down on them from two side. So I cut them flat, thinking that would solve the problem. A trial fit of the roof showed me that I needed to trim them some. They need to angle down below wall level on the outside of the walls to fit well. I finally managed to accomplish this with a pocket knife. It's pretty rough and still wasn't really deep enough, but it'll do.

Remember this photo from page four? It's a bit mystifying to figure out how these pieces go together, so I thought I'd show a photo of each of them in place. They're all designed with interlocking tabs at the top, so at least there's that to go on.
 Ā
Ā


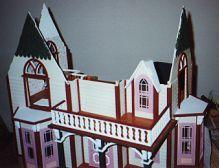
I put the first roof piece in place and then glued the attic floor in place. Each gable end has 4 slots. The inner slots line up with the tabs on the gable wall and the outer slots line up with tabs on the gingerbread (that's the term for the fancy gable decorations on the roof of edge). I was surprised how well they fit. I knew my walls weren't real square and so I expect the roof to fit poorly. There was a little space between the attic floor and the roof, but nothing that caused any problems.
 Ā
Ā

The next two pieces make the front gable roof leaving an opening over the extra corner in the house. The second photo also shows the two smaller roof pieces that go over the dormer. They both have the same kind of tabs as the gables.

Here's the final three roof pieces. They were the hardest to get into place and they basically hold each other up. The tape helped a lot in holding them in place. The top, flat, piece kept falling through the gap so I glued a small scrap onto the gable roof for one end of it to rest on. It came out a little two low, but the cedar shakes will cover a multitude of errors.
 Ā
Ā
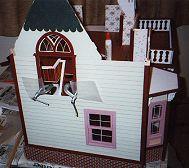
You can see the gingerbread boards in place on both of these photos. Each gable and the dormer have one. When I got to this point I questioned my decision to make these boards white, but I think it'll look good once the shakes go on and the roof is brown. Right now it looks funny because white is the predominate color.
Previous Page | Photo Page | Next Page