Back to Photo Page
Dollhouse Construction Photos, Page Three
Of Walls and Windows
Well, it's been a while since I've added to these pages. I took about a two month break from the dollhouse, partially because I had other things I needed to do and partially because I needed a break after all I went though with the walls.
 Ā
Ā
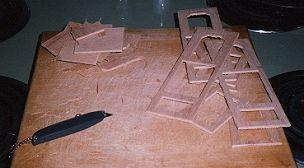
Once again here's the pieces still in the plywood waiting to be punched out. I broke several pieces of the bay windows even after going over the edges with an exacto knife. Luckily all the parts for the upstairs windows came out very easily. The quality of the individual pieces of plywood makes a big difference.

Here's a mountainous pile of parts. This is a little more than half the total number of window pieces. These belong to the upstairs windows and the door. All of these will need to be sanded, painted and then assembled.
 Ā
Ā


This shows all the parts of one bay window. The plastic pane is glued between the two smaller rectangular pieces (one of which is broken) and then slides freely in the bay window wall. The bottom picture show those same pieces with the parts for the door. The plastic "glass" comes silk-screened with the window design. It's a real easy way to end up with a nice looking product.
 Ā
Ā

The inside and outside of a bay wall and the door.

The assembled bay window. I left one of the bays unassembled in order to be able to take better pictures of it. These windows went together wonderfully. I used normal white glue and set a book on top to hold all the pieces flat. It was also very easy to line the windows up (which wasn't the case when the walls were up). Unfortunately all the rest of the walls were already glued into place. If I had to do it over again I'd put all of these windows in before putting up the walls.
 Ā
Ā

Here's the same bay window from the inside and the door in place.
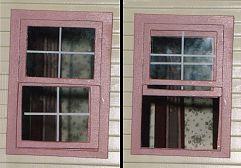
Here's what's all the fuss is about: working windows. Not only does the individual window pieces make for very realistic looking windows, it also allows them to open and close. I managed to get only 1 of the 8 first floor windows to actually work right. The pieces that slid nicely unfinished are stuck tight due to the surprising thickness of the paint. Unfortunately I learned this lesson after painting most of the windows.
Building this doll house has been a lot of fun punctuated by moments of sheer frustration. Unfortunately the windows turned into the later. Because I followed the instructions and put the walls up before putting in the windows, I had to find a way to put them in place without the help of heavy books. I resorted a type of super glue that works on wood. Because it bonded quickly I was able to hold the frames flat and in place as it set. Unfortunately the fumes also "frosted" the edges of my windows.
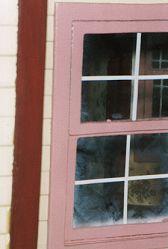
Trial and error managed to show that the "fog" could be removed with an eraser. Unfortunately the eraser begins to leave it's own marks once it's soiled. I went through a pack of erasers fixing this problem. The windows still appear slightly dirty, but it's a huge improvement.
 Ā
Ā

Inside and outside the windows look pretty good. The second bay is glued into place and it's time to continue on to the second storey.
Previous Page | Photo Page | Next Page