Windows Explorer
File Management
The Windows Explorer application can usually be found in the Start Menu- Programs-Accessories folder.
If you need to move, delete, copy or to simply view your files, this is the best application to use. However, caution is needed here, as careless manipulation of your files may result in a dead system.
Below, is a picture showing the general layout of Windows Explorer. It may differ from your version depending on your version of windows and the configuration chosen as described later.
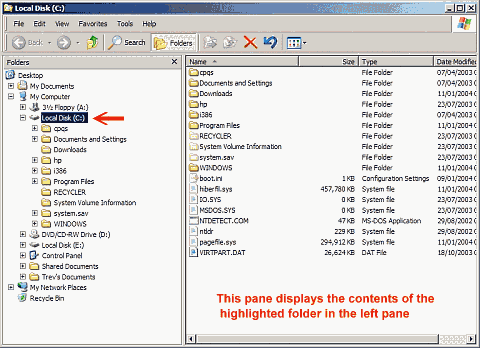
Referring to the above picture, the left pane displays all your drives ( Hard drive, CD rom drive, Floppy drives etc), and all the top level folders. The right pane displays the contents of whichever drive or folder is highlighted in the left pane. To the immediate left of each item in the left pane is a small box with either a + or - sign. The + sign indicates that the folder contains sub folders. If you click on the box, the sub folders will be displayed in the left pane.
The Basics
Files and extensions
Every file name has two parts, the filename itself, followed by a full stop, and a file extension which identifies the type of file, as per the drawing below :-

Unfortunately, Microsoft, in its wisdom, decided not to show the file extensions in the default views. This makes it difficult to identify files properly. Before we do anything else, we are going to correct this. Referring to the picture below :-
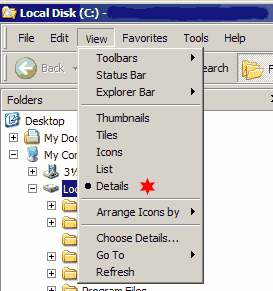
Select View on the menu bar and then select Details. Now you will see that the contents of the right pane have changed to give you the detail view. Unfortunately, you still cannot see the file extensions. To correct this, go to Tools on the menu bar, select Folder options and the dialog box shown below will appear.
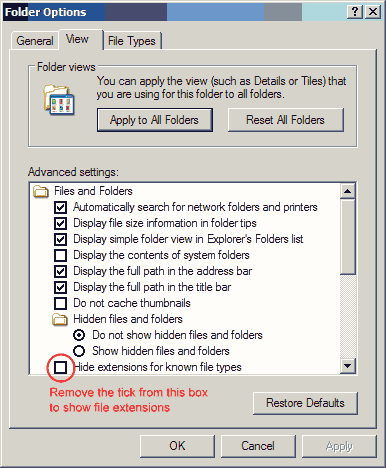
Remove the tick from the box next to 'Hide extensions for known file types', then click Apply and OK. You will notice that by default, the hidden files and folders are set to 'do not show'. This refers to critical files in the windows operating system. I recommend this setting is left like this to minimize the risk of altering or deleting by accident.
![]()
File Types
Every program you run on your computer is made up of individual files. There are many types of files, each designed for a specific purpose. The type of file is shown by the file extension, for example :-
'.exe' This is an executable file, which means that it contains a set of instructions which will be carried out when double clicked or triggered by other means such as a menu item.
'.dll' This is a file used by an executable file. It contains a set of routine instructions.
'.txt' This is a simple text file. It will often contain instructions for the user to read. You can also create these files yourself in the Notepad application in the Accessories folder.
'.doc' This is a document file produced by Microsoft Word.
'.hlp' This is a help file that you would normally view by using the help menu.
'.gif'', '.jpg', '.bmp' These are the most common types of picture file.
'.mp3', '.wav' These are sound files.
There are very many other types of files, too many to mention here, but this will give you an idea what you are looking at in the windows explorer window.
Copying, Moving and Deleting files
As a general rule, you should never delete, copy or move files such as '.exe' or '.dll' etc, that are listed in an application directory. This can lead to the application no longer working. This is because the application was installed by a special program that would not have put all the files in a single location. Removing one application file is likely to stop the program from working and may effect other programs. If you wish to delete the application, you should use the Add or Remove applet in the Control Panel.
You can however, delete, move or copy files that have been created by the application, such as text, document, picture and sound files. The application itself will tell you the names of the files created and their location. It is a good idea to copy any important files you have created to a separate location to minimize the risk of losing them if disaster strikes.
The simplest way to copy or move a file from one location to another is to Right click on the file, holding the button down, drag the file to the folder you wish to move it to, when that folder is highlighted, release the mouse button and a dialog box will open asking wether you wish to move or copy the file. Make your selection and its done.
Alternatively you may use the Send To menu. Right click on the file and release the button. In the dialog box that opens up, select Send To, then select the new location from the list. Unfortunately this method gives you few options. However you can add new options to the list. See Creating Shortcuts lower down the page.
Deleting files is simply a matter of right clicking on the file, and from the dialog box that opens, select delete. You will be asked if you wish to send the file to the recycle bin, click OK. If you make a mistake you can always go to the recycle bin and restore the file.
Organizing your files
Organizing your personal files in a logical manner is extremely easy to do in Windows Explorer. You simply create the folders you require and move or copy your files into them. For example if you wanted to create a folder for your photographs on C:\ Drive, click on the symbol for local disk (C:) in the left pane, go to the menu bar, click File , New, Folder. A new folder will appear under C: with the words New Folder highlighted. Type the name over the highlighting then click enter, your new folder is ready. Use the same method if you want to create a folder inside another folder, just click on the folder to highlight it and follow the same steps.
Creating shortcuts
A Shortcut is a direct link to a file from a remote location. Most of the items in the menu are shortcuts to the appropriate .exe file to start the application. Again, it is a very simple process. For example, say you had created a folder for your photographs but you didn't want to open windows explorer every time to access it, you could create a shortcut to the folder on the desktop. To do this, Right click on the folder and holding the button down, drag it to the Desktop symbol in the upper left corner of the left pane. When the Desktop symbol is highlighted, release the button. A dialog box will appear, select Create Shortcut here, and your done. Now if you double click the shortcut on the desktop, your folder will open on the desktop. You can create shortcuts to any file or folder and place them in any location, including the start menu.
Adding shortcuts to the Send To menu
The Send To menu is simply a list of shortcuts to various locations. If you want to add a shortcut to this list from a folder which you have created, in order to make it easy to send files there, all you have to do is create a shortcut from your folder and place it in the Send To folder, which is located as follows :-
Win95/98 Located in C:\Windows\Send to
WinXP Located in C:\Documents and settings\Username\Send to
Note - In WindowsXP, if the Send To folder cannot be seen, you will need to open the Folder options diaog box as shown above, and change the Hidden files and folders category to Show hidden files and folders. You can change it back after you create your shortcuts.
![]()