Comprehensive Example of HPS Play
This page shows how the new Napoleonic Campaign engine by John Tiller offers the players a true free flowing version of combat in the eighteenth century period when empires and the face of Europe were being changed. Below is a typical game turn of Campaign Eckmuhl. All three branches of service are covered. I chose to play the scenario called 'H07. Davout Follows Orders' (filename 07h_eckmuhl.scn). The date is 21 April 1809 and the time is 10:00 am. This scenario lasts for thirty-two turns unless the players end it earlier.
The forces in this scenario are two divisions of III Corps under Davout (Friant and St. Hilaire) and one division of Bavarians from VII Corps (Deroi) which make a total of 31,000 men. The Austrians have 42,600 men in the III and IV Corps. The III Corps is fixed and unless the French are dumb enough to unfix them will remain that way for some time. From the start of the 1:30 pm turn, they have a five percent chance of releasing.
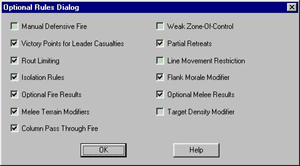
I chose the following options for play:
I will skip forward a bit in the game to where the action heats up. We pick up the action at turn three. The French have advanced to within range of the Austrian gunners. The French are about to launch an attack. The Austrians are set up to provide some fire support from their batteries. Here we go ...
The first thing that happens is that we select a French battalion to
change into Line Formation.

The battalian advances to within musket range of the Austrian battalian.

No fire is made by the AI on the advancing French. We proceed to fire with the French battalion.
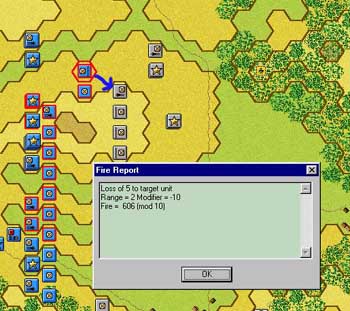
The Austrians do not return fire. We advance more of our French battalions and light companies to within range. Here is a sequence showing some return fire.

The French lose 13 men. They were fired on by the 2nd Bn./Belgarde Regiment IR#44. The size of that
battalion is 750 men. The range was two and the modifier was zero. The French do not disrupt. They return fire.

Which was followed by another round of fire from the same unit.
Mulitple shots from the same unit can be attributed to a unit that was
able to get off better fire than average. Defenders do not run out of
ammo so there is no way for a phasing player to attempt to ammo
deplete an opponent by drawing fire with units like leaders or supply
wagons. The latter by the way will quickly be reduced and without
resupply units will quickly run from the enemy. Also you cannot draw
fire and then expect that your next advance will be met with silence.
You can expect to be shot rather freely each time you advance!
You will have to plan your attacks very well or you will be defeated
in detail.

A further six losses were suffered on a subsequent fire by the same Austrian unit. Note that it is wise to change formation before you come into contact. This is both historically correct and also saves you from a lot of extra casualties as the AI will fire at you as you make a formation change. Also leaders and skirmishers should accompany a battalian as if they stack with them later they can trigger fire which will cause more losses
to the formed battalion. Here is an example of a line battalian moving up in column and attempting to deploy in range of the Austrian line.
Meanwhile, the French advance some more units. Here is a regiment
that advance in the same stack. Watch what happens to them when an
artillery unit fires on them. Note that the option for Column Pass Through
Fire is turned on. This means that artillery firing at a stack that has
multiple columns in it will fire on each column individually. This portrays
the bowling ball effect that was prevalent when massed formations were
hit by artillery. With grapeshot it would be as if the units were hit by shot
that passed through the column. Also note that the units advanced side
by side in alot of cases. This then is the effect when you try to cram in
alot of manpower into one hex. Even smaller battalians will suffer losses
as the frontage idea comes into play.

Here the French just lost ten men in one battalion and thirteen in the other. Note that the
skirmisher was not affected. Advancing in large stacks will be a painful lesson for an opponent when using this
option.
Now we will launch an attack with those units and another stack of Frenchmen.
First, the fire from the infantry resulted in two of the attackers getting disrupted.
This halves the values of the attackers (see the melee odds and strengths).

The player can call off the melee if he likes and use the other two battalions that
are adjacent. Note that this will draw more fire as they attempt to initiate a melee
(which is done by the player mouse dragging the units onto the enemy stack).
This is the decision that our French commander chose. Lets see what happened.
Note the initial odds before any return fire was made.

1561 to 700. So far so good eh? Now what happens when the player initiates the melee.

Wow! Only one man fell as they formed up to attack! Nice going Napoleon! Now how did the melee go? Lets see ...

A victory for Saint Hilaire's men. Both attacking battalions are now done
for the turn but the rest of the French force is ready to move. They do so
and here is the situation at the end of the turn.

|
Several of the French battalions were shot at while
they tried to form line in front of the artillery and a
battery lost a gun when it tried to climb up a small
hill. At the end of the turn we find the losses as such:
French Infantry: 402
French Cavalry: 0
French Artillery: 1
Austrian Infantry: 591
Austrian Cavalry: 0
Austrian Artillery: 0
The Austrian losses so far are due to a stack of skirmishers
that the French cut-off in the southern half of the board.
So far the Hapsburg forces are doing well.
Now for the Austrian response. They have some cavalry
to their north so some squares are undoubtably a good idea. |

As units cannot square during the enemy's turn you must plan for some
squaring in your phase. This battalion of the Archduke Karl Legion
were successful. This is not always the case and a failed attempt results
in the unit staying in its current formation and being disordered besides. More moves by the Austrian player follow. Here we see a lone squadron
initiating a charge to be followed up by his companions in the following
illustration.


Note the attackers strengths. They are tripled due to their charge. They had to
change to Charge Mode first, then they could only move in their frontal arc (forward
two hexsides) forward to contact braving all fire that came their way. Then once they
intiate melee they get fired on again.

They lose six more troopers but they close! Here are the melee results:

Note that now that those units have been attacked that they cannot
be attacked a second time. If they had retreated into a hex that had
a unit that had not been attacked in that player phase then the cavalry
could continue to press the charge. Here is the error message you
get when you try to attack the stack a second time.

This concludes the comprehensive example. It may be updated at a
later date.
[Written by Bill Peters.]
