Skirmisher Lore, Part 2
5) Outflanking enemy line units
Where possible, you should use skirmishers to outflank enemy line units. and even to get behind those units. This may assist in a zone-of-control (ZOC) capture, where the line unit cannot retreat and is removed.
'Various sources indicate that the French skirmishers were quite adept at penetrating larger holes in the enemy battle formation and positioning themselves such that they could fire on the flanks of the forward units.'1
The ZOC capture is one of the more controversial aspects of the Battleground games. However, I particularly like this quote from Paco Palomo, which I saved from the NWC message board:
'I would agree that a company of 50-100 men could not physically prevent
500-1000 fleeing enemies from barreling over them. However, it bears mentioning
that the "elimination" of a battalion in the game does not necessarily represent
the capture or death of an entire unit. Rather, it represents the fact that
an entire unit has lost its cohesion and/or unit integrity to the point that
it is 'hors de combat' for the rest of the battle. The unexpected appearance
of organized enemies in the rear of a defeated unit is precisely the type of
event that would lead to the complete disintegration of all order and the scattering
of a unit for the remainder of the day.'
This does not mean of course that you should send skirmishers in great sweeping movements behind enemy lines like some kind of 20th Century commando raid. Not only is it ahistorical, but a good opponent will be keeping an eye out and will rapidly chew them up with overruns by his reserve cavalry at no loss to himself.
6) Holding a chateau
Skirmishers are the best units to hold a chateau. Units in line, which would have had to start the scenario that way if they are to be undisordered, are very susceptible to artillery fire in the flank. Units in column remain vulnerable to very close fire and can be meleed in the flank. Finally, squares while having no flanks, have added vulnerability to artillery fire.
Placed in a chateau, skirmishers will still take artillery hits, and may rout, when at strengths above 250 men, but no experienced player will even think of wasting ammunition when your strength falls below that. Guards make the best garrison for a chateau as they pick up an additional modifier favourable to you. In addition witholding fire in the defensive phase when a melee is pending will pick up a further one. And finally, if the chateau is really important to you, placing a leader there will pick up yet another favourable modifier. In such cases add an ammo wagon, which will allow your skirmishers to continue firing longer. Indeed if you have no ammo wagon, your garrison should avoid firing, as you want to avoid any negative "out of ammo" modifiers at all costs.
Since meleeing a chateau requires odds of at least 4-to-1, and more against guards, and the attackers will become fatigued before the defenders, a good strong garrison of 250 guards handled this way forces your opponent either to waste an inordinate number of his own skirmishers, or else to risk his line units. Such a garrison will almost certainly survive longer and in better order then one consisting of far larger strengths of infantry in column or square.
Need a really strong chateau garrison? Well there is one other thing you could add to your little skirmisher garrison. It's not infantry. It's certainly not cavalry. It's... (I'm almost too afraid to tell you).
7) Reconnaissance
Skirmishers are also critical to your reconnaissance efforts. Is there anything
hiding in that ditch yonder? Send out a skirmisher unit. They are also very useful
placed up on any available high ground, including high ground behind your position,
and sent way out on your flanks to make sure your opponent isn't concocting any
plans there. And then don't forget to sweep that forest you're passing by.
"When operating in broken terrain, it was the mission of the skirmishers to search through
all the cover the might conceal any possible ambush. [...] The objective being
to expose and turn any ambushes. To do this some individuals were expected to
seek high points and expose themselves to the enemy, thereby causing the enemy
to think that his position was turned."2
Historically, cavalry vedettes were not the only instruments of reconnaissance. Here's a lovely quote
from Marbot's memoirs:
Historical: 'I entered now upon the vast and dreary plains of Old Castile. At first sight an ambush seems quite impossible in this treeless and mountainless country; but it is so undulating that this apparent security was deceptive. The hollows between the frequent hillocks allowed bands of insurgents to hide, and pour forth unawares upon French detachments, marching with confidence through a country where they could apparently see four or five leagues all round them and discover no enemy. A few disasters had made our men more cautious, and they no longer crossed the plains without searching the hollows with skirmishers.'3
'Pour forth unawares'. Beautifully simulated by Battleground Fog of War. Whilest true that the above describes a strategic route march, it applies just as well to a tactical or battlefield situation.
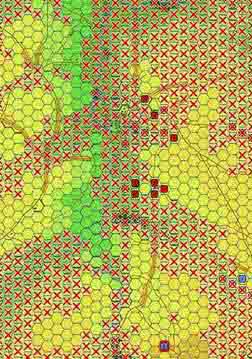
Diagram: Here a single French skirmish unit (bottom of screen) keeps
track of the greater part of the Allied far right wing at Waterloo. It is in
a position to pick up almost all movements on the flank as the low ground is
barely continuous. You will note however, that there is a ditch running North-South
through which an allied 'raiding party' could still pass unseen, and you'll
need to plug that with one more skirmisher. Has an opponent of mine ever tried
such a 'raid'? Yes, one did... and paid for it. A historical ploy? Absolutely
not.
8) Supporting with parent units
One possible use of the parent light units is as reduced lines or squares to
protect an advanced row of skirmishers from being overridden by enemy cavalry.
Breaking down the light units till they are only 125 or so in strength leaves
a residual unit that is more valuable formed than as just another skirmisher.
These residual units can be brought up close to the the skirmish line, or used
in the same hex as artillery batteries, under circumstances where the full strength
battalions are better advised to keep their heads down. While true that such
reduced units are vulnerable to artillery fire, and may indeed be entirely wiped
out in just a few turns, they will meanwhile help to protect your skirmisher
line, the value of which you should never discount. A line of skirmishers can
often amount to some six or eight hundred men who cannot easily be replaced.
In considering the historical analogy of this, one notes that skirmishing companies
were seldom broken down completely into a skirmish line. Rather the skirmish
line itself (pairs of men in open order, one loading and the other firing) consisted
often of only a third or so of the company strength, the remainder of the company
remaining formed and in close support.
'The Austrian 1807 regulation clearly states that it was the third rank
of the infantry company that was detached [as skirmishers]. [...] The skirmishers
moved at the doublirschritt and opened up until they were at six pace intervals.
The skirmish screen established itself 300 paces in front of the battalion.
About 80-100 paces behind the screen a Zug stood in closed order to act as a
reserve and quick support for the skirmish screen. At 100 paces further back
the captain stood with the two remaining Zügen of the company as yet a further
reserve.'4
A Zug is roughly a double-strength platoon.
Now this analogy with the supporting formed unit as I outlined it at the start of this topic is not of course accurate. In that case, one is talking about a residual formed battalion, which is not at all the same thing as the supporting company, or its platoons, in the historical example. Nonetheless, it's as close as one can get in the Battleground games to the idea of a formed support for the skirmish line. Just remember though that such use of the residual battalion is just a gaming hint and not a historical description in this case.
Historically the skirmish line was indeed far more complex than the Battleground® engine really suggests, and that most people visualize. It was not just a few little fellows hiding in the bushes, but a multilayered deployment, capable even of forming rally squares or 'klumpen', something you should remember when next you engage in debate with someone suffering from Battleground skirmishophobia.
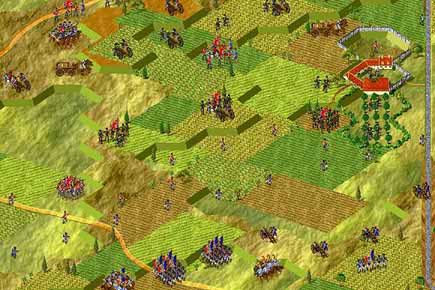
Diagram: This example is not to everyone's taste. The Allies have adopted
a very forward position to protect their artillery on the heights. Nontheless
it is a perfected version of a tactic employed against me from time to time
by very good Allied commanders.
The allied squares are 125 to 200 men. On the
left, a residual guards unit in square, elsewhere residual rifle units in line
and square . One battery is exposed to cover the low ground. Ordinary and some
guard skirmishers make up the skirmish line. The riflemen are behind this with
the formed units, with the batteries at the rear, and in the orchards (see Section
11 below). Only one skirmisher is not covered by the zoc of a formed unit. Flank
attacks against the residual line units are effectively impossible.
What is all this really? It's a skirmish line! Pressing the 'S' button once or at most
twice for any of the formed units would result in them disappearing completely
into skirmishers. How long will this last against a french grand battery? Not
long. Perhaps three or so turns. But it will buy that delay at the total risk
of two battalions and one battery. The cost to an impatient French commander
who tries an assault without building a battery first:- considerable, given
the Allied artillery to the rear.
Footnotes
1 Nafziger, G.F., 'Skirmisher Tactics in the Napoleonic Wars Part I: Intro
and France', Empire, Eagles, & Lions Vol. 2 No. 14. (Online at Magweb)
2 ibid.
3 Marbot, Baron Marcellis de (1892), The Memoirs of Baron de Marbot, (On-line at Napoleonic Literature)
4 Nafziger, G.F. 'Skirmisher Tactics in the Napoleonic Wars Part II: Austria', Empire, Eagles, & Lions Vol. 3 No. 1. (Online at Magweb)
[Written by John Pumphrey. Courtesy of
The Napoleonic Wargame Pages.]
