Tactics for Light and Guard Units
This is an introduction to advanced tactics,
which can be used, mainly for defence purposes in the
Battleground Waterloo & Prelude to Waterloo. It is for use
with units that are capable of going into extended line and
especially for Guards and Light Battalions that are capable of
deploying more than one Skirmisher Company. However other units
can use these tactics as long as they stay adjacent to each
other, in order to move the skirmishers.
The tactics are especially useful when threatened on a large
front, when ground coverage is essential to stop being out
flanked.
Extended line

The first move is during the defence turn. Change formation,
into extended line this doubles your ground coverage and provides
twice the fire power, I would recommend, that if possible these
manoeuvres, if at all possible be carried out, behind a hill
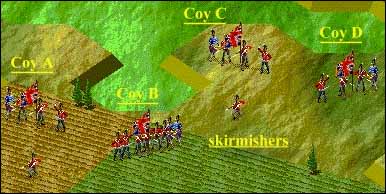
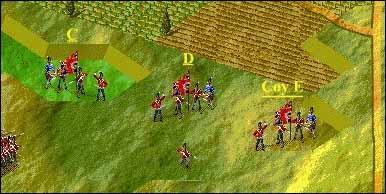
ridge line or at least out of sight of the Enemy Coy A & B
from 1st Battalion. Coy C and D from 2nd
Battalion. Each coy has equal numbers.
Deploying skirmishers
Next during your movement turn, this is when you have to
decide how you want to deploy your battalions in the oncoming
battle; there are several ways you can deploy.
Whist the two companies are adjacent you can move skirmishers
from one unit to the other.
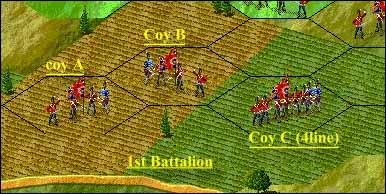
The permutations are endless, but for this session lets move
400 skirmishers from Coy A to coy B and likewise with Coy C and
D. You now have you now have two companies of 900 men and two of
100 men, or two companies of 800 plus 2 skirmish companies.
The important think to remember and the main benefit of the
next moves is to reposition Coy's A and C to the rear and
at an angle, the reason for this will soon become clear. Place
any officers present with companies A and C.
Recall skirmishers
In the next defence move Coy's B and D recall their
skirmishers by going into ext line. The benefits of this are
Coy's A and C are still in ext line of 100 men, Coy's
B & D are now back in 4 line formation and are capable of
either repeating the whole process again (if numbering over 600
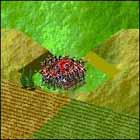
men) or can change into square or column.
Square and further extended lines
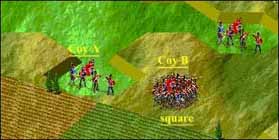
Here Coy B has formed square, Coy A is still in extended line and
can if required in the defence turn, recall Coy B if threatened
by cavalry or artillery.
Here are a few scenarios, which might demonstrate the uses.
Coy B is threatened by cavalry or artillery, it can if require
FIRE! Then Coy A recalls B, the whole unit is now back in 4 line
formation, and as long as Coy A DOES NOT FIRE, it can also change
formation, into Square, or column, if it does fire it will remain
in 4 line formation. This is also true if Coy B is disordered or even
Routed, by recalling Coy B the whole Battalion comes back
into good order.
Further extended lines
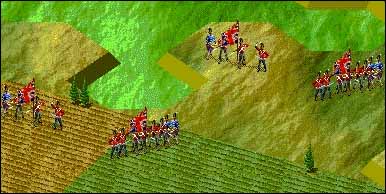
Here Company D has again gone into extended line, thereby
creating 3 companies; a further skirmisher has been deployed
which will enable company E if required to reform into 4line
formation, and subsequently column or square. Again skirmishers
can be moved between all 3 companies to suit the problems faced.
The benefits of doing this is if threatened again, by recalling
units all three companies can be reformed back into one unit,
thereby effectively moving the forward unit 2 hexes in the
defence turn.
Recall position
To be able to recall 3 or more companies there are several
rules that must be obeyed. Any extended line unit that is going
to recall the next unit MUST be in good order. Any unit that is
going to recall a unit MUST have that unit on it's flank
hex, the other unit does not have to facing the same way or even
be in good order.
Any Officer must be in the hex with the final company, or he
will be left out in 'no mans land' and remember to
recall from the front line to the rear.
In the above picture Company B will recall Company C (note the
way the units face) company A will then recall the newly formed
Company B (B and C combined)
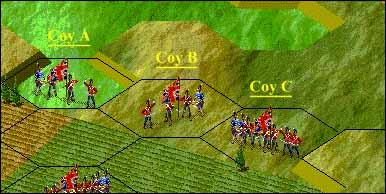
In the above, the officer has got his positioning wrong. Coy B
can not recall Coy C. However Coy A can recall Coy B, thus
forming two 4 line units, but if Coy C is in difficulties, it
cannot be recalled. For this to work Coy C should have been 1 hex
back, where it says 'Coy C' If that was the case all
three units could be recalled to Coy A.
Other uses for these formations
Two extended line battalions placed side by side (a 4 unit
front) Cavalry is placed behind. When threatened by cavalry,
during the defensive turn the Line units recall to the flanks,
leaving a two hex gap for the cavalry to
counter charge in the defensive turn.
Two extended line units again side by side, but the inner
company of each Regiment in the same hex (3 unit front), when
threatened, the two out units fire, the front rank of the inner
units fires, then is recalled, leaving a second rank which can
also fire, this unit then can be recalled if required. A third
rank can even be put in thereby tripling the firepower from 1
hex. Extended line companies can even attack French Skirmishers, turning defence into attack, then be
recalled.
The number of uses for these tactics are endless I have
mentioned only a few, I suggest practising with these formations
to see the full benefits. The majority of these manoeuvres can be
achieved with any unit that can change into extended line,
including the Hanoverian battalions. I now as a matter of course,
in the early stages form my Hanoverians and Dutch into
extended line, well away from the fighting, then by moving
skirmishers between the two units unit I have the main unit of
500 - 600 men and a HQ company in extended line of between 25
and 75 men. The main unit can be formed into column and the HQ
Company held in reserve to quickly reorder any units that become
routed or disordered. (Remember to move the HQ companies well to
the rear to avoid disordering) The enemy will not notice the
number changes and think you have just deployed skirmishers.
[Written by Paul Harris. Courtesy of the
Anglo-Dutch Library.]
