Skirmisher Lore, Part 1
1) Harrassing the enemy line
The primary function of a skirmisher unit is to cause disorder and loss to enemy line units by fire alone, and perhaps even to rout them.
'The first [goal] was to engage the enemy's formed units and pepper away
at them until their moral was so shaken by the continual effect of seeing people
falling around them that they would break when attacked by formed infantry.'1
Battleground simulates this well. A unit already disordered prior to melee does indeed pick up a -1 rout modifier. This 'softening up' process can mean the difference between the success and failure of an attack, not in the sense that disordered units defend less well, but in the sense that they are more likely to rout.
Even better than just disorder, skirmishers can inflict considerable fatigue if allowed to pick away over a period of time, and fatigue penalizes the enemy with negative melee modifiers as well as rout modifiers.
Historically, a distinct tactic of the skirmishers was to fire at the leadership element of the line units. This is not visible in the Battleground games, as the leaders in such cases were mainly at the platoon, company and battalion level. It is rather part of the general concept of disorder.
A clear example of skirmishers going quite a way towards winning a battle is that of the French at Jena, where Hohenlohe's infantry before Vierzehnheiligen, while admittedly fatigued and demoralized by futile attacks on that village, and also fired upon by artillery, were nonetheless primarily routed by skirmishers, against whom they appear to have been completely unscreened by skirmishers of their own. They stood in that fashion in squares for nearly two hours, as Petre tells it...
Historical: '[Massenbach's advice to drive forward] was not taken, or at any rate not
acted on, and the line remained in its position, suffering more than the best
troops could be expected to bear for long. Already one regiment on the left,
which had shown symptoms of breaking, had only been held in place by immense
exertions, even by violence, on the part of the officers. Young Eberhard, the
junior officer of the Sanitz regiment, a mere child still, seized the colours,
shouting to the men, "See! here is your standard; it you must follow." He fell,
pierced by many French bullets, still clinging to his colours. In vain his heroic
effort, and those of many others; the men could stand no more. Regiment after
regiment began to fall back. For half-an-hour some sort of order was maintained;
but by two o'clock the whole left and centre, from Isserstadt to beyond Vierzehnheiligen,
was a confused mass of panic-stricken fugitives. Arms were thrown down, guns
abandoned; men yielded themselves prisoners in hundreds to the pursuing French.'2
2) Screening your own line
Shooting through skirmishers picks up a -1 modifier, so putting skirmishers ahead of your infantry is the same as putting the infantry behind a hedge.
'The second function of a skirmish screen was to protect the friendly forces
behind it from the fire of the enemy's skirmishers. This they did by engaging
the enemy skirmishers and physically preventing them from approaching the friendly
lines.'3
This is reflected in the Battleground series by the -1 modifier against fire through a skirmisher line, but somewhat oddly artillery fire picks up the same negative modifier as fire from formed infantry units and other skirmishers.
Artillery on higher ground can shoot over the heads of the skirmishers up to about 5 hexes or so, ie. without picking up the -1. This plus the cavalry threat are good reasons to keep skirmishers close to your line units, where they have a better chance of protecting such units from fire. In an extended firefight they can quite likely save more than their own weight in casualties.
This of course can work against you as well, so the best position for artillery is at the edge of high ground, and shooting over your skirmisher screen below.
Note that the -1 modifier is cumulative with other types of negative modifiers, but not cumulative with other skirmishers. Thus shooting through a skirmisher and a hedge will pick up a -2 overall, but shooting through a friendly and an enemy skirmisher will only pick up a -1 overall.
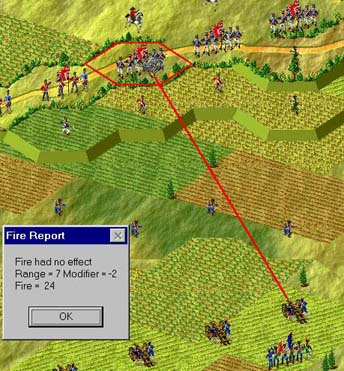
Diagram: In this illustration from Waterloo, the Allied skirmishers
and a hedge have together imparted a -2 modifier to what would otherwise be
strong French artillery fire. The French skirmisher screen is correctly placed
in the depression beneath the artillery. Although unprotected by LOS, there
is no cavalry threat in this part of the field. Such placing does not help the
French in this instance as a double line of skirmishers does not inflict a cumulative
modifier.
3) Protecting your flanks
This can be broken into two parts:
a) A skirmisher placed in a hex flanking the parent unit will prevent an enemy infantry unit from swinging in against the parent's flank.
b) A skirmisher placed WITH an infantry unit negates the -2 modifier which your opponent would get if he managed to melee it from the flank. The skirmisher has to be facing in the correct direction, namely towards the flank hexes not covered by the zone-of-control of the parent unit. This is rather painstaking to implement since the skirmisher's facing does not come up in the unit dialogue.
You need to be sure though that the skirmisher is not in a higher fatigue bracket than the parent unit, else it can add up to -2 against you in melee anyway. Yet another good reason for looking after the skirmishers that belong with their parent units.
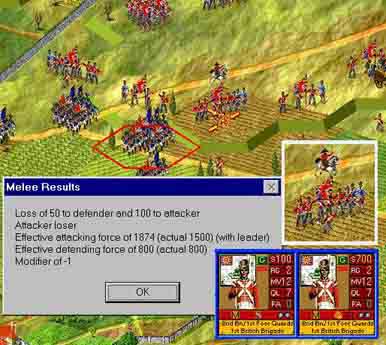
Diagram: This melee looked like a reasonable chance for the French.
While two against one are not great odds uphill against guards (-2 modifier),
the French get a +1 for their leader and another +2 for a flanking attack. Not
so? Actually it is not so at all. The skirmisher has negated the +2 flanking
benefit, and instead the French get a -1 modifier overall, and pay the penalty.
Note the facing of the skirmisher in the blow-up. Had he been facing forward,
the overall modifier would have been +1 to the French.
4) Holding terrain
Skirmishers are useful in holding ground when their parent units need to keep their heads down, provided that the terrain is selected carefully.
Thus skirmishers in unclear hexes, including buildings, not only stop cavalry charge overruns, but negate the times-three bonus in the melee. So placed they are as good as, and a lot cheaper than, a cavalry screen.
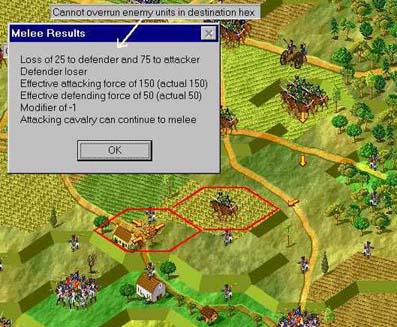
Diagram: In this shot from Battleground Waterloo a new lieutenant,
out of frustration and seeking a speedy breakthrough, or even merely some intelligence
of what lies beyond, has had his Prussian advance guard charge a Young Guard
skirmisher unit in a building hex. The first message (status bar) shows that
no overrun is possible. The charge is stopped. Worse news awaits our intrepid
lieutenant. The melee results are awful, there being no times-three factor,
the skirmishers suffer the usual reduced casualties, and on top of that a melee
modifier of -1.
How not to win Waterloo!
Footnotes
1 Nafziger, G.F., 'Skirmisher Tactics in the Napoleonic Wars Part I: Intro
and France', Empire, Eagles, & Lions Vol. 2 No. 14. (Online at Magweb)
2 Petre, F. Loraine (1907), Napoleon's Conquest of Prussia: 1806, The Bodley Head, London)
3 Nafziger, G.F., loc. cit.
[Written by John Pumphrey. Courtesy of
The Napoleonic Wargame Pages.]
