Skirmisher Lore, Part 3
9) Screening cavalry charges
Skirmishers placed ahead of advancing cavalry in its movement phase prior to the
charge phase will stop a counter-charge by your opponent in his defensive phase.
In addition they will protect the cavalry to some degree from enemy fire, even
though it may not seem like much.
The skirmishers will protect the cavalry up
till the point where they are about to charge, and may even be used to protect
hexes behind the point at which the cavalry charge and melee will end, thus protecting
the line of withdrawal. Naturally this will only protect these rear hexes from
enemy infantry encirclement in the movement phase, and not from subsequent melees
or from enemy cavalry overruns.
In order to charge through a
line of skirmishers, highlight the cavalry and then move them a hex at a time
with the right mouse button. The double-click will not work.
Skirmishers running
ahead of a cavalry charge? How historical is this? Surprisingly more so than you
may think. For one thing cavalry seldom charged at the speeds Hollywood would
have us believe. Here is a thought-provoking quote from a better than average
coffee-table book on Waterloo. The description is of Ney's first charge (emphasis
mine).
Historical: 'Meanwhile, advancing obliquely towards the allied centre,
was the pride of the French army--their magnificent cavalry arm. Murat, who
had led them to so many victories, was missing, but the indomitable Michel Ney,
Marshal of France, Prince of Moscow, with his mop of red hair and Irish blood,
was at their head. They came on slowly at a measured trot, for although the
ground had not yet been churned into a quagmire, the tightness of their formation
forbade a greater speed, and anyway it was their wont to ride into battle unhurried.
'As the cavalry began their ascent to the top of the ridge the skirmishers,
who had accompanied them thus far, dropped back and the great batteries of guns
fell silent. The usual noise of battle suddenly gave way to the thundering of
thousands of hooves as they beat upon the ground; the pace did not quicken,
nor did the formations waver when faced with the muzzles of the allied guns.'1
10) Screening withdrawing cavalry
We all know that skirmishers ahead of advancing cavalry will stop a counter-charge in the defensive phase, but so often one forgets how useful they are in protecting withdrawing disordered cavalry from the same fate. And of course skirmishers will again protect the cavalry against fire to some extent. The likelyhood of skirmishers being needed for this role should be foreseen at the time the cavalry charge is launched.
11) Treating your riflemen as cannon
The British riflemen are a truly awesome weapon, and should be used with the greatest care and preserved as much as possible. Therefore break down the rifle units fully into skirmishers, and place them as often as possible behind the first skirmisher screen and together with your line units or artillery. Thus protected they can pop away steadily at enemy infantry using their extended range, and are particularly devastating against cavalry.
Each skirmish unit should be fired individually. Firing them together does not multiply the fire value, merely the roll. Especially where they are at such a distance that they are more likely merely to inflict fatigue, it is far better to attempt to fatigue as many enemy units as possible, and you will still pick up the occasional lucky 25-man loss as well.
When fatigue has been inflicted on an enemy unit, proceed to target the next unit while keeping as far as you can a mental note of the fatigue-inflicted enemy units. Mere fatigue may only be inflicted once on a unit in a given phase. Fire these skirmishers first, and any artillery in the area afterwards, the reason being that artillery is more likely to inflict loss as well as fatigue, and may with greater profit retarget units already fatigued.
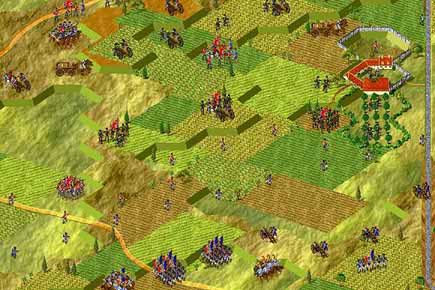
Diagram: This is a repeat of the illustration to Section 8 above. Note
that the riflemen are to the rear of the first skirmish line, and placed with
the formed units, in the orchard, and with the batteries to the rear. Their
fire will cover the entire lowlying area ahead of the 'skirmish' line, and the
riflemen to the rear would assist the artillery in penalizing severely any attempt
to run down the first line with cavalry.
12) Breaking down the British Guards
If you're playing the Allies in Battleground Waterloo and you don't like extended line or don't wish to use it on a particular occasion, you need to break the Guard units down to below 600 strength (ie a 2 rank line), else you take a huge loss in potential firepower. You don't even need to move these Guard skirmishers anywhere--just deploy them in the same hex (above the unit in line in the stack) and fire them separately.
This is particularly useful where you need to build a formation of strong squares using the guards. The presence skirmishers does not negate the value of the square and greatly increases it's firepower. Should you later wish to increase the strength of the main unit for melee, just reincorporate the skirmishers.
Congratulations! You have graduated Skirmishing 101.
Footnotes
1 Seymour, William, 'A Cloudburst of Cavalry in Chalfont', Lord (1979), Waterloo: Battle of Three Armies, (Book Club Assosiates), p111
[Written by John Pumphrey. Courtesy of
The Napoleonic Wargame Pages.]
