|
|
|
|
|
|
Module 3: Configuring the Windows NT Environment
Advantages of the Registry
Type of information contained in the registry:
Six components that use the Registry:
|
Component |
Description |
| Windows NT kernel |
|
| Device drivers |
|
| Setup programs |
|
| Hardware data |
|
| Hardware profiles |
|
| User profiles |
|
The registry is structured like folders on a hard disk, it has a hierarchical structure that contains: The Hierarchical Structure of the Registry
|
Hierarchies |
Description |
| Subtree or "Root key" |
|
| Keys and subkeys |
|
| Values |
|
| Value data types |
|
| Hive |
|
|
The Maximum size for any registry value is 1 MB |
The Five Subtrees of the Registry:
| Subtrees | Description |
| HKEY_LOCAL_MACHINE |
|
| HKEY_USERS |
It contains two subkeys:
|
| HKEY_CURRENT_USER |
\winnt_root\System32\Config folder
|
| HKEY_CLASSES_ROOT |
|
| HKEY_CURRENT_CONFIG |
|
An Example of a Subtree: HKEY_LOCAL_MACHINE
The HKEY_LOCAL_MACHINE subtree provides a good example for the registry because the structure for all the subtrees is similar.
It has five subkeys (see below) which are all (except HARDWARE which is dynamically created when the computer is started) considered hives because they have corresponding files in the "winnt_root\system32\config" folder. Applications can query all these subkeys but can only add information to the SOFTWARE and the SYSTEM subkeys.
Subkeys of HKEY_LOCAL_MACHINE
|
Subkey |
Description |
| HARDWARE |
|
| SAM |
\winnt_root\System32\Config folder
HKEY_LOCAL_MACHINE\Security\SAM |
| SECURITY |
|
| SOFTWARE |
|
| SYSTEM |
|
Applications can modify ONLY the SOFTWARE and SYSTEM Subkeys Control Panel Hardware Settings
The Windows NT Control Panel contains programs, used to configure specific sections of the registry. Some of these applications are used to control configurations on the computer, these are not user dependable.
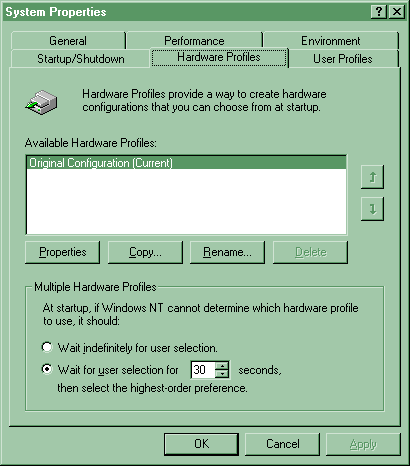
| NOTE: To create a new profile: copy the original, them modify and save. This will guard against accidentally disabling one of the boot devices causing an NT boot failure. |
How to Configure a Network-disabled Profile
All hardware profiles have a Network tab with a single option: Network-disabled hardware profile

NOTE: There are two other
programs that can modify the hardware profiles
Both are located in the control panel and have Hardware Profile buttons. |
Configuring COM ports
To determine what device is using an unlisted serial port, use the registry editor and look under:
\HKEY_LOCAL_MACHINE\HARDWARE\Description\
System\MultifunctionAdapter
Or
\HKEY_LOCAL_MACHINE\HARDWARE\Description\System\
EisaAdapter\0\SerialController
Under the SerialController key are subkeys for each port, with
0 for COM1
1 for COM2
2 for COM3...etc.
Configuring the Display
| Note: only users with the "Load and unload device drivers" user right can change the video drivers. By default only the administrators group has this user right. |
| Configuring SCSI Adapters and Tape Devices |
- Both programs have two tabs, Devices and Drivers. Tape devices can be automatically detected clicking on the Detect button.
- Use the Properties button to find device info, such as SCSI ID number, firmware info and SCSI host adapter.
Configuring a UPS
During a power failure, UPS will keep the system running (but pauses the Server service) until:
- Power is restored.
- Administrator or UPS shut down.
- The UPS signals that its batteries are low.
Make sure to test the UPS once you have installed it particularly on x86-based computers. During startup NTdetect.com sends a detection signal to its Serial ports and some UPS will shutdown in response. If that happens you will have to modify the "Boot.ini". use the /NoSerialMice switch in the "Boot.ini" to prevent the detection signal from being sent to the serial port.
Options in the UPS program:
|
Select this checkbox |
If |
This setting corresponds to |
| Power failure signal | It can send a message when the power supply fails. | Clear to send (CTS) pin signal for the UPS serial port connection. |
| Low battery signal at least 2 min before shutdown | It can send a warning signal. | Data Carrier Detect (DCD) pin signal for the UPS serial port connection. |
| Remote UPS shutdown | The device can accept a signal from the UPS service to shutdown.. | Data Terminal Ready (DTR) pin signal for the UPS serial port connection. |
| For the preceding selections: the default UPS interface voltage setting is negative, it can be set to positive. | ||
|
Select this checkbox |
To |
Use these parameters |
| Execute Command File | Execute command file just before shutdown. | This can be any .com, .exe, .bat, or .cmd file and it has 30 seconds to complete its task. |
|
Use this option |
To adjust |
Range and default |
| Expected battery life | Time, in minutes that the system can run on battery power | Range:
2-720 minutes
Default: 2 minutes |
| Battery recharge time per minute of runtime | Amount of time to recharge the battery. This is the amount of time without protection. | Range:
1-240 minutes
Default: 100 minutes |
| Time between power failure and initial warning message | Range:
0-120 seconds
Default: 5 seconds |
|
| Delay between warning messages | Range:
5-300 seconds
Default: 120 seconds |
|
| Configuring PC Cards |
| Control Panel Software Settings |
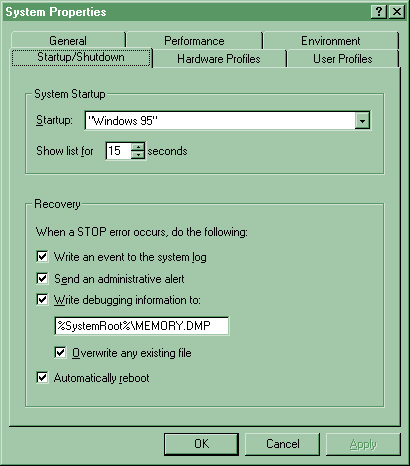
- System startup: select one of the startup options to be the default. You can also set the time for the system to wait, for you to choose a startup option before it starts up the default. Setting it to "0" will bypass the option to choose at all.
- Recovery: here are four options to choose from if there is a stop (fatal system error).
- Write event to system log
- Send administrative alert to computers specified in the Alerts box of the server program in control panel.
- Write debugging information to specified file (can be helpful for MS-support engineers).
- Auto reboot. Choose only when "Write debug information" is selected.
| Configuring Virtual Memory (p105) |
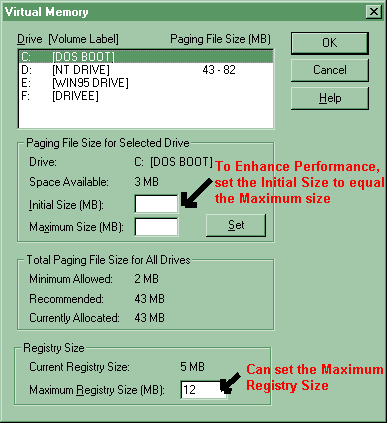
This is the Virtual Memory dialog box accessed from the Performance | Change buttons.
After a page file is created, it will not shrink below its initial size. When a Windows NT computer is restarted, page size will be reset to the initial size. Make sure that when you change the size of the page file to click the Set button, to really make the change.
You can enhance performance by creating more
paging files on multiple disks, and not putting the paging file on the same
disk as the winnt_root directory is.
| Setting Environment Variables (p107) |
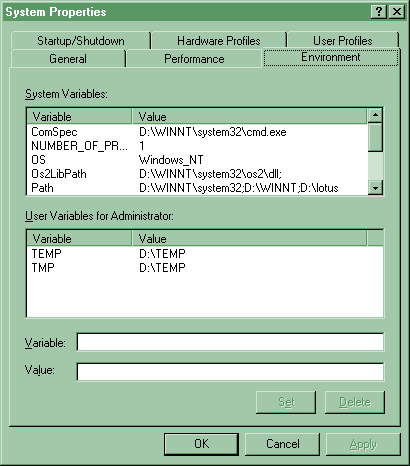
- System environment variables.
- Can be changed only by administrators.
- apply to the system as a whole and therefore all users: e.g. path to the Windows NT files
- User environment variables.
- Can be modified by any user, and are different for each user
- include user defined and application defined variables such as the path to the application files.
How NT sets Environment Variables
Windows NT searches the Autoexec.bat for various variables, like "Path" and adds them to the system variables, every time Windows NT is booted.
Windows NT sets the Environment variables in the following order:
| Adding and Removing Windows NT Components |
| System Policy Editor |
There are two modes to work in:
Registry Mode
Policy File Mode
Registry Settings are organized into two hierarchies:
Local User
Local Computer
Examples of policy:
| Registry Editor |
Regedit.exe vs. Regedt32.exe
You can also use the regedit.exe command that launches the Win 95 registry editor.
REGEDIT.EXE Cons:
- NO security menu
- No auditing
- NO Read-only mode
- Does not support REG_EXPAND_SZ or REG_MULTI_SZ
- Using Regedit will display these data types as REG_SZ
REGEDIT.EXE Pro:
- You can see all the keys in the window; Regedt32 displays each key in a separate window.
- Regedit.exe allows you to find keys, values, and data in the registry. Regedt32.exe only allows you to search keys and subkey, but NOT value entries or actual data values.
- You can use right-clicking to find, delete, rename or copy a key name
- By default only administrators have the Full Control rights for editing the registry, others have read-only rights.
- An administrator can modify the rights through the Security menu in the Registry Editor.
- to prevent accidental and potentially system wide problems: click READ ONLY MODE on the OPTIONS menu.
An overview of some useful registry commands:
|
Command |
Function |
| Find key |
|
| Save key |
|
| Restore |
|
| Save
Subtree as |
|
| Select
Computer |
CurrentControlSet\Control\SecurePipeServers\winreg
|
NOTES:
SAM
Each NT computer contains a security accounts database known as the SAM. This keeps track of user and group permissions.
NT Workstation computers: SAM contains security info for the local computer
ONLY
NT Server Domain Controllers: SAM contains security info for local computer
AND the entire domain
Registry Hives and their log files
Here's what happens: each registry update is recorded in the .log file
and isn't considered complete until it is entirely finished at which point the
change is entered in the log. If the system fails half way through, at reboot
the info in the log file is used to ROLL BACK the transaction and restore the
Registry to a stable state.
Recovering the Registry Using the Last Known Good Configuration
Much of the information necessary for Windows NT to start up is stored in
the
HKEY_LOCAL_MACHINE\SYSTEM\CurrentControlSet subkey. If you—or a program
on your
system—make invalid changes to one of the value entries in this subkey,
your system
could fail to boot. Or, if it does boot, it could prevent you from logging
on.
To help protect against these kinds of accidental problems, NT keeps copies
of the
HKEY_LOCAL_MACHINE\SYSTEM\CurrentControlSet in
HKEY_LOCAL_MACHINE\SYSTEM\ControlSet001 and
HKEY_LOCAL_MACHINE\SYSTEM\ControlSet002.
If your NT system fails during startup and you suspect it has something
to do with a
Registry change you just made or a device you just installed, you can tell
NT to use the
backup version of the control set by pressing the SPACE BAR during the boot
process
when NT displays the message Press spacebar NOW to invoke Last Known Good
Menu.
When you invoke this option, you lose any changes made to the Registry since
the last
time a user successfully logged on to the system.
Using the Registry Editor Remotely
One of the great strengths of the Registry Editor, and of Windows NT, is
the capability to
remotely access and edit the Registry database. From a Windows NT machine,
you can
use the Registry Editor (REGEDT32.EXE) to connect to a remote system running
Windows
NT.
Using REGEDT32, choose the Registry | Select Computer menu option. This
will display a
browse window, enabling you to locate a remote computer.
Using the browse box, select the computer whose Registry you want to view,
or type the
computer's name into the Computer field.
You are now connected to the remote computer's HKEY_LOCAL_MACHINE and HKEY_USERS
root keys.
NOTE: Remember,
the other root keys are simply links to other subkeys, either in the
HKEY_LOCAL_MACHINE or the HKEY_USERS root keys.
When you are finished viewing or making changes to the remote computer's
Registry,
select the Registry | Close menu option to close the connection to the remote
Windows NT
system.
NOTE: When
you connect to a remote NT system's Registry, you are granted the level
permission determined by your user account and the
privileges granted to it on
the remote system.
Securing and Auditing Information in the Registry
Backing Up and Restoring the Registry
The REPAIR DISK Utility (RDISK.EXE) takes a "snapshot" of the state of the Registry and saves that file to a floppy disk (the EMERGENCY REPAIR DISK)
It saves:
I'm sorry, but I can't answer specific network-related, or exam-related questions. |
|
| Last Updated: August 6, 2001 | Grant Wilson, Edmonton, AB Canada |